Optimize tracing spend on LangSmith
Before diving into this content, it might be helpful to read the following:
Some of the features mentioned in this guide are not currently available in Enterprise plan due to its custom nature of billing. If you are on Enterprise plan and have questions about cost optimization, please reach out to your sales rep or support@langchain.dev.
This tutorial walks through optimizing your spend on LangSmith. In it, we will learn how to optimize existing spend and prevent future overspend on a realistic real-world example. We will use an existing LangSmith organization with high usage. Concepts can be transferred to your own organization.
Problem Setup
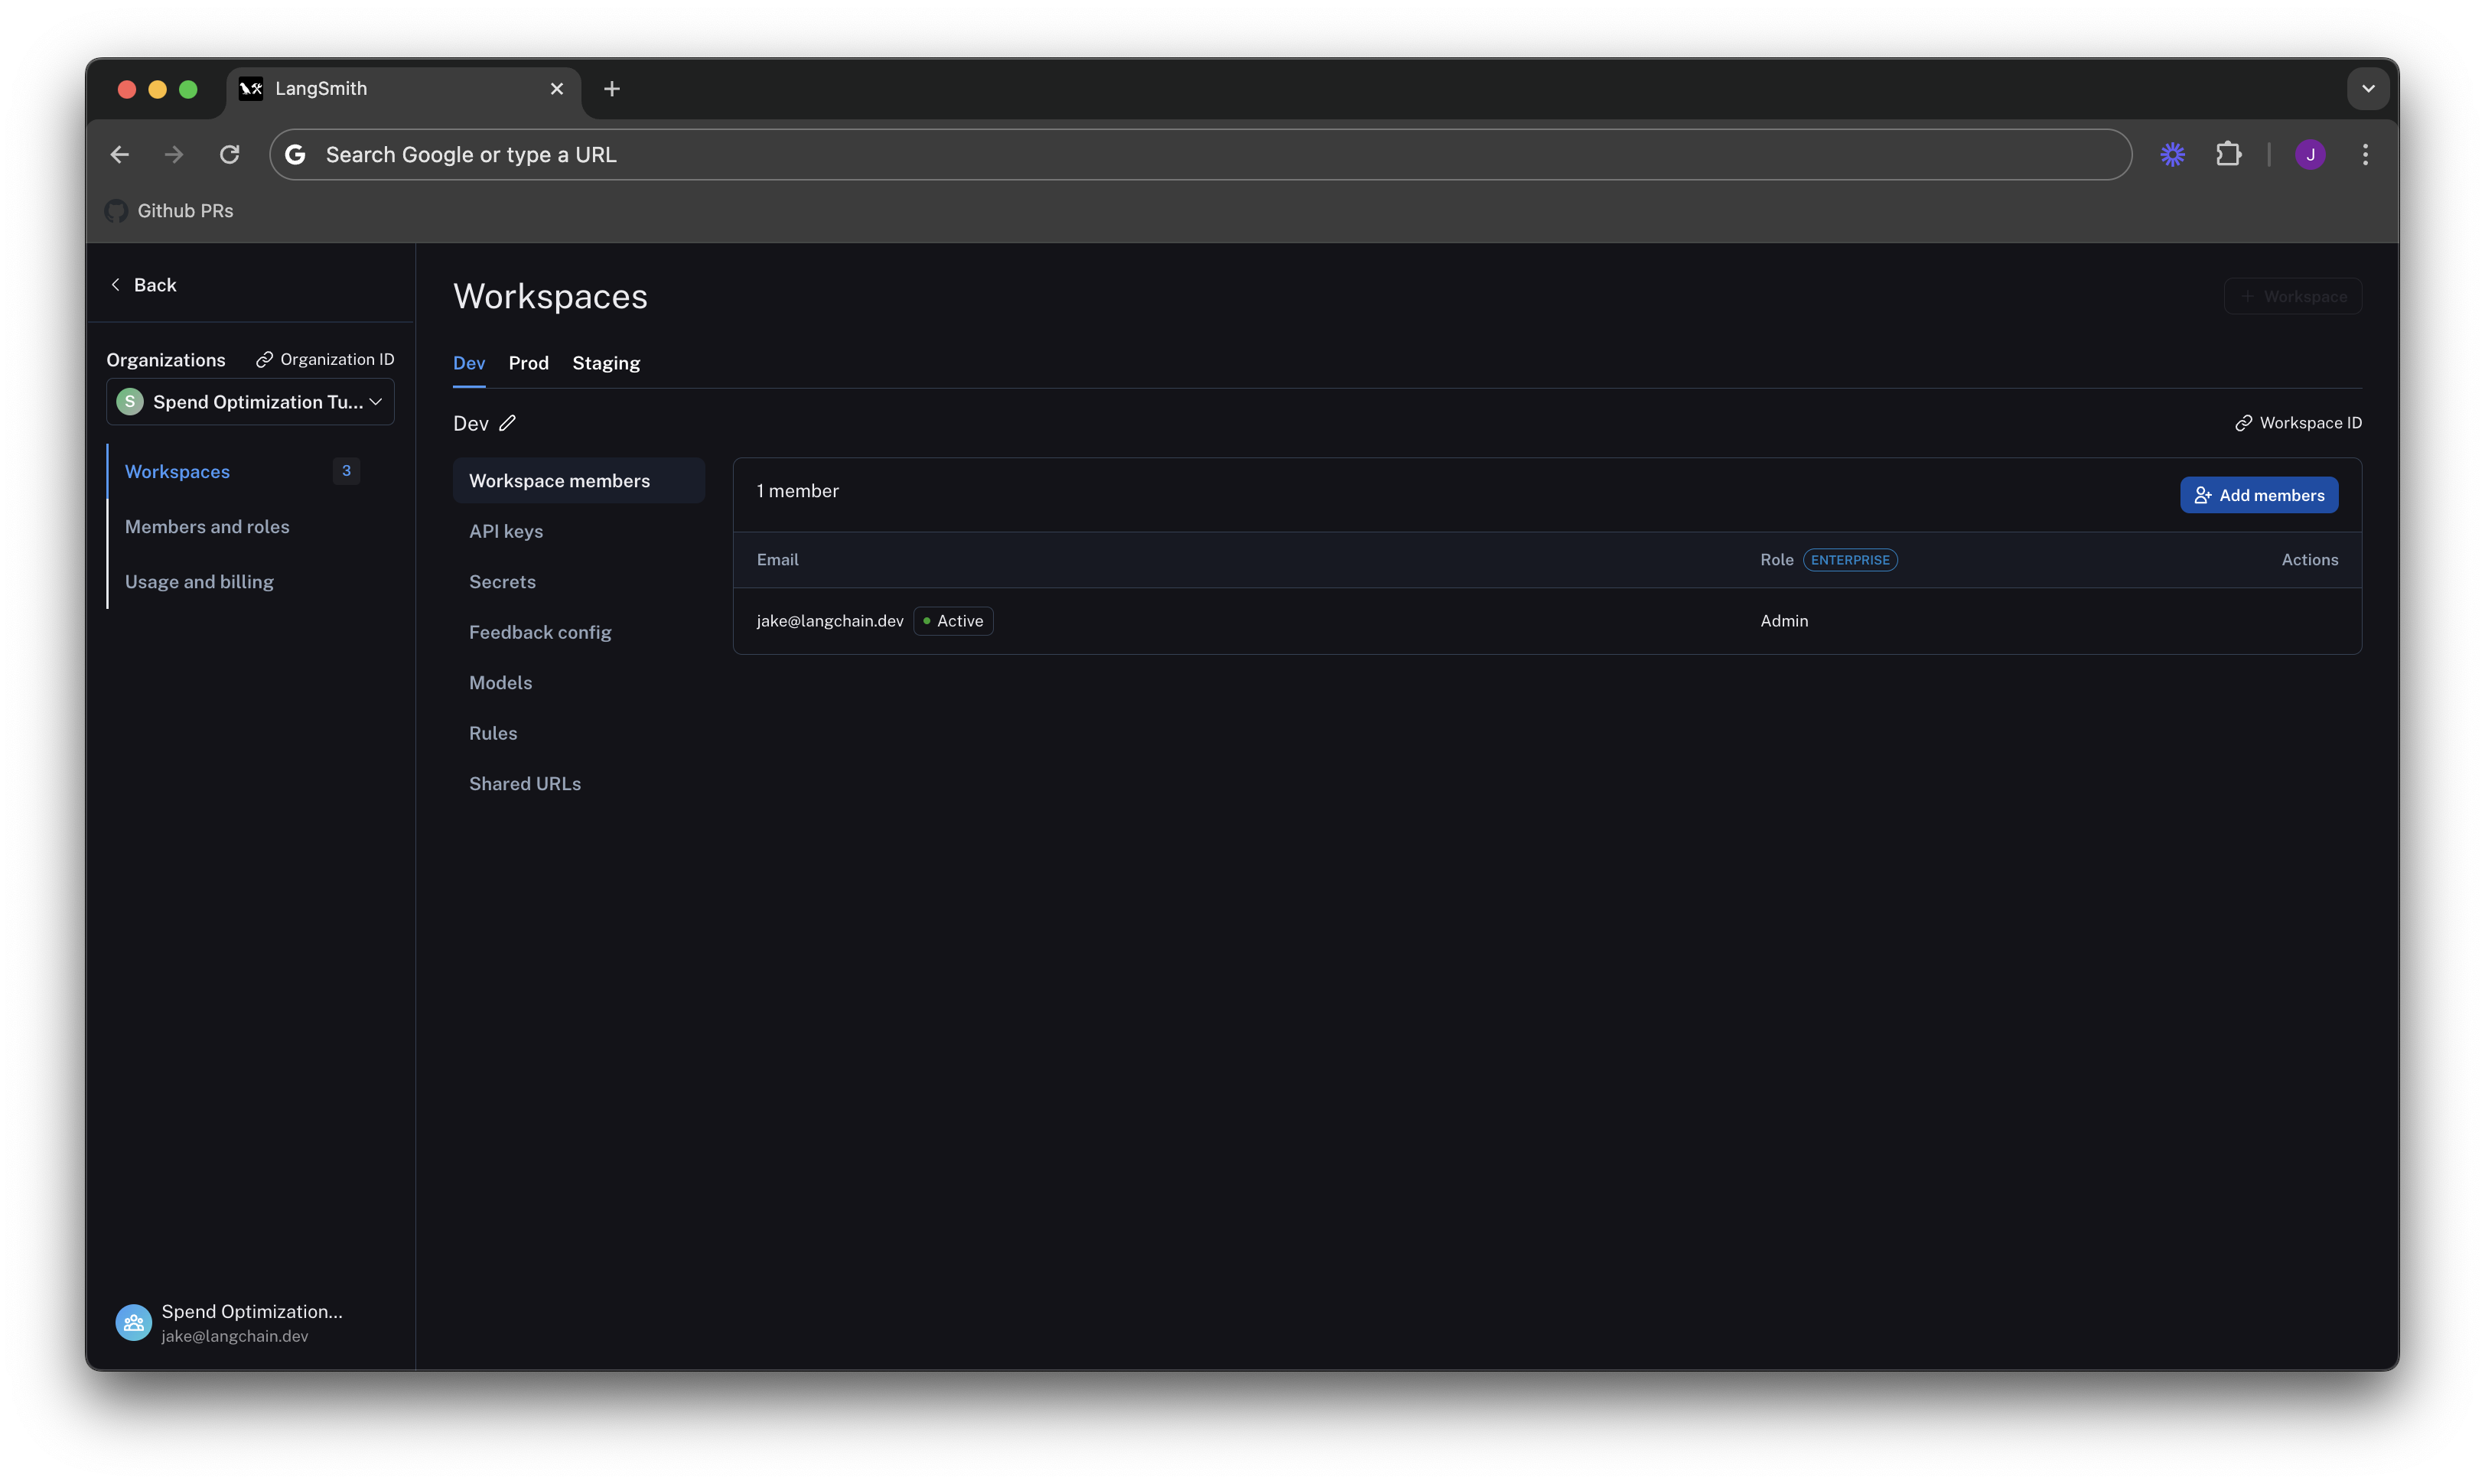
In this tutorial, we take an existing organization that has three workspaces, one for each deployment stage (Dev, Staging, and Prod):
Understand your current usage
The first step of any optimization process is to understand current usage. LangSmith gives two ways to do this: Usage Graph and Invoices.
Usage Graph
The usage graph lets us examine how much of each usage based pricing metric we have consumed lately. It does not directly show spend (which we will see later on our draft invoice).
We can navigate to the Usage Graph under Settings -> Usage and Billing -> Usage Graph.

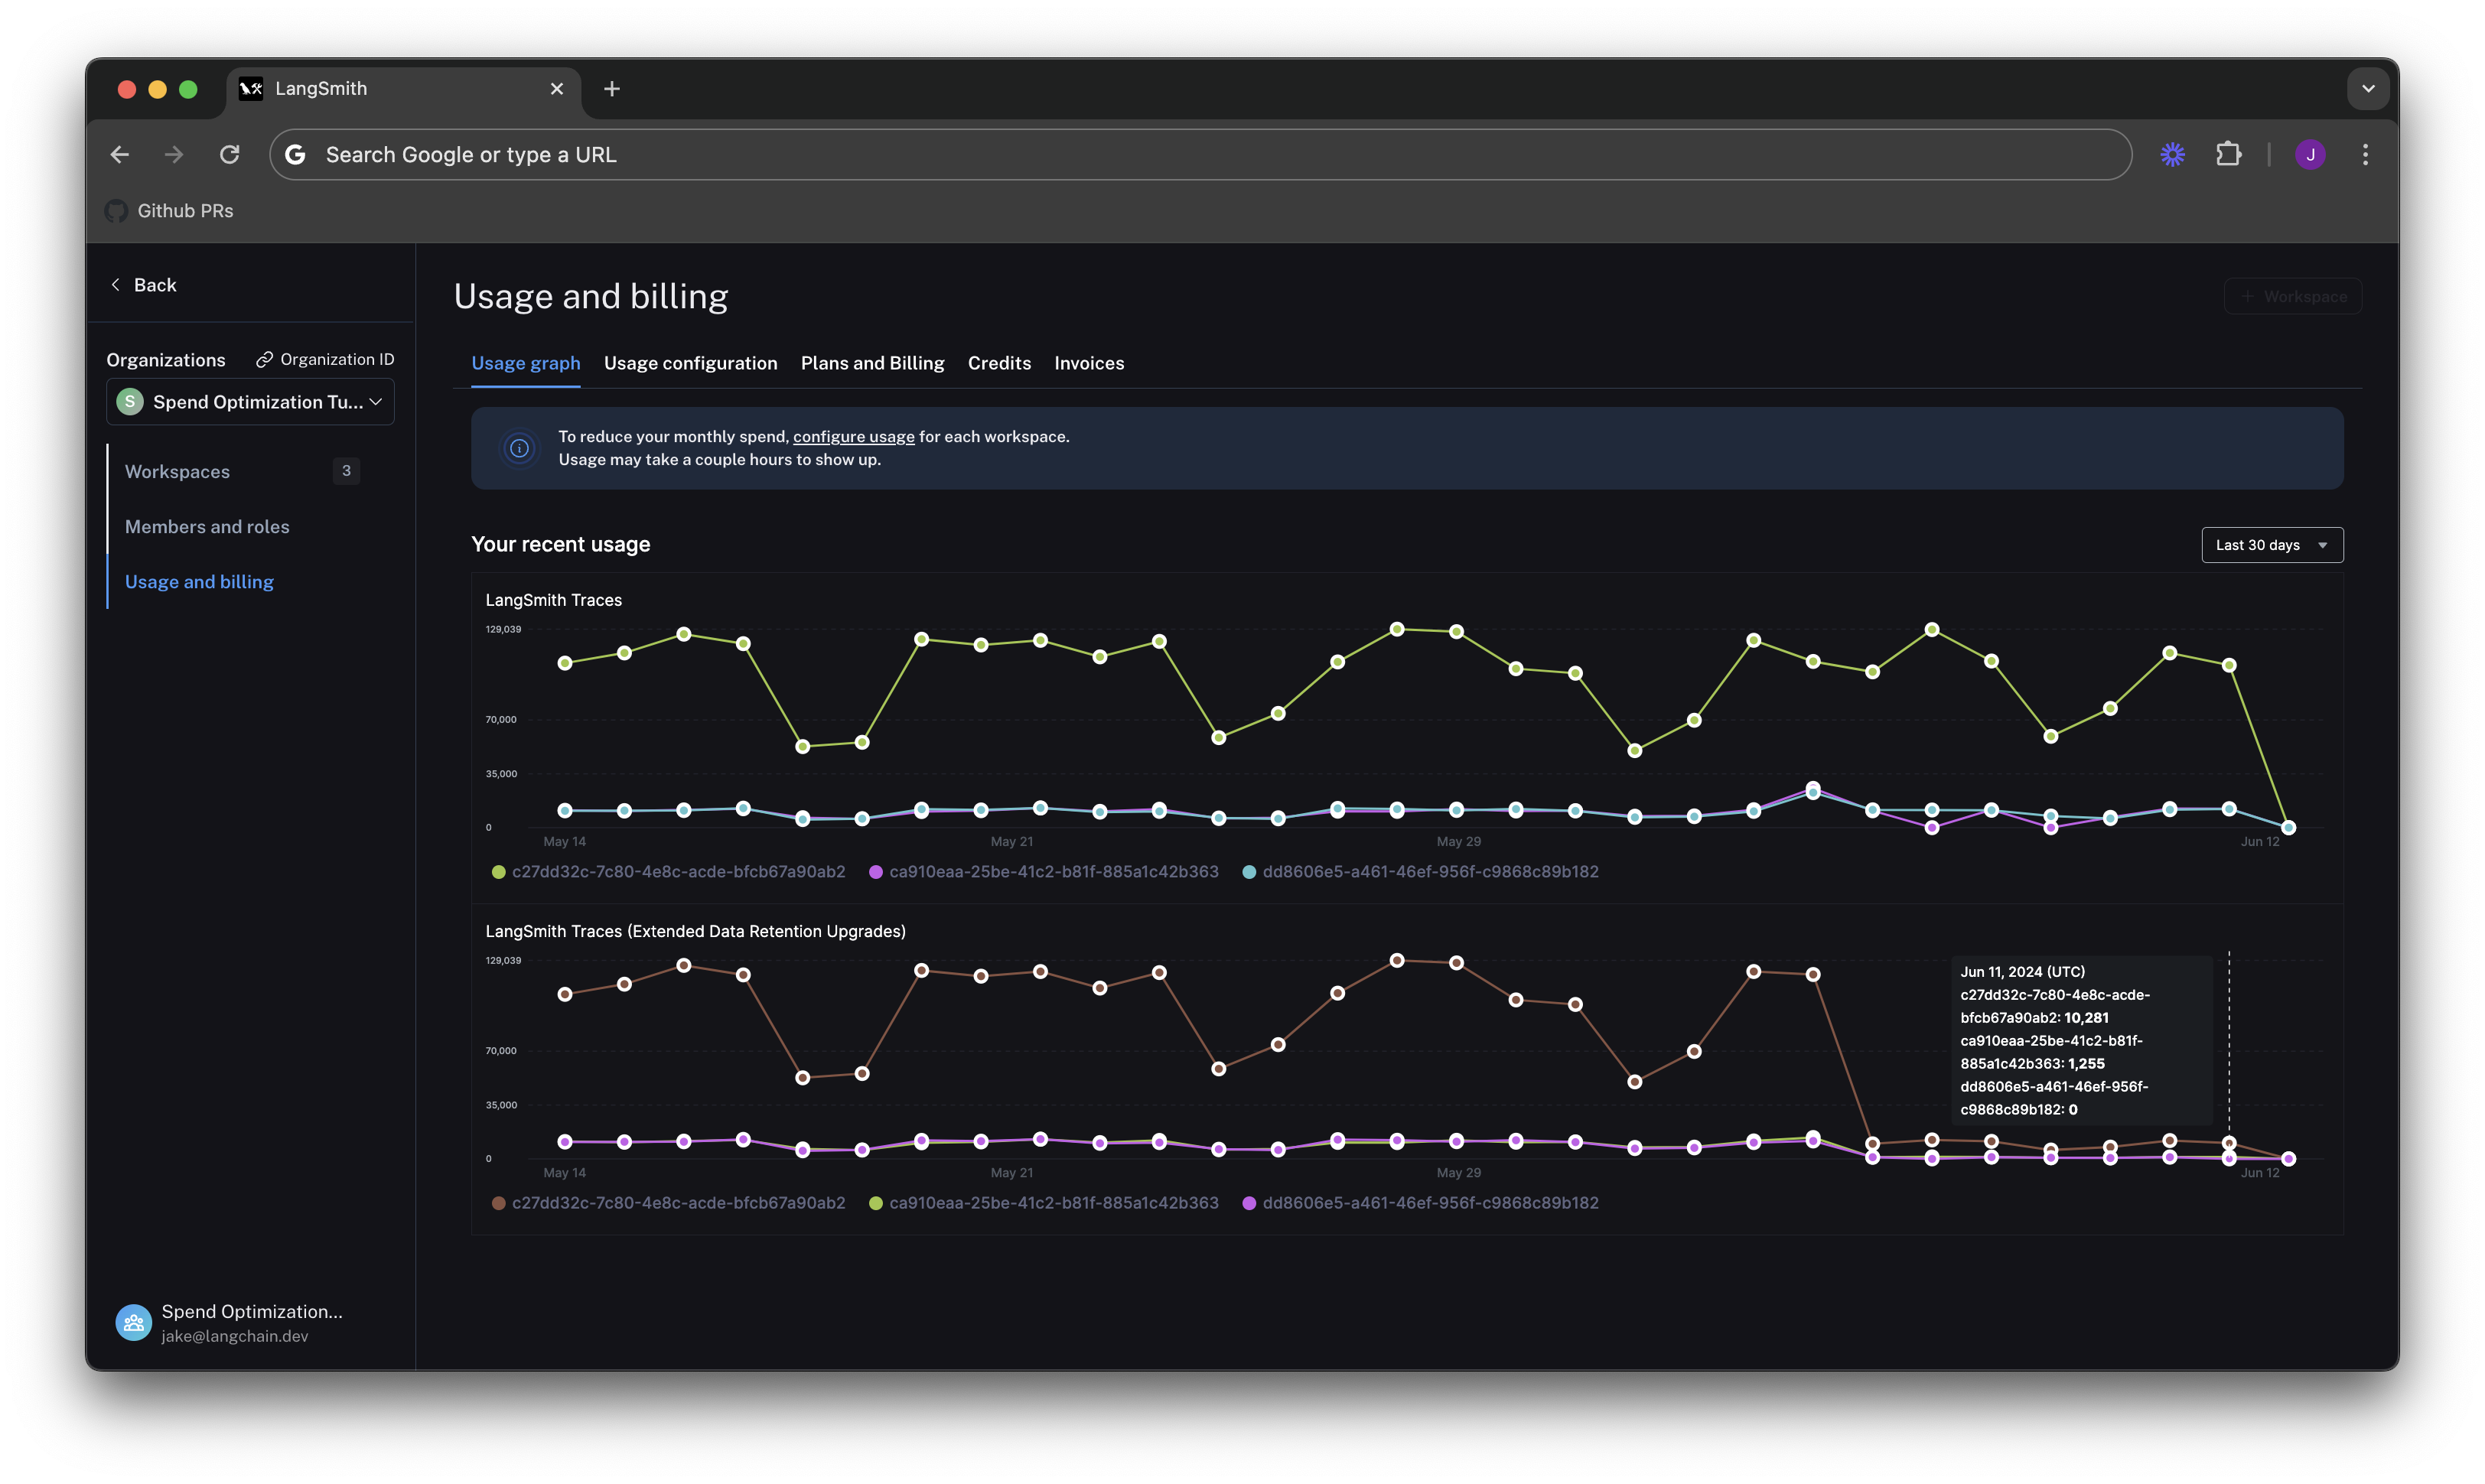
We see in the graph above that there are two usage metrics that LangSmith charges for:
- LangSmith Traces (Base Charge)
- LangSmith Traces (Extended Data Retention Upgrades).
The first metric tracks all traces that you send to LangSmith. The second tracks all traces that also have our Extended 400 Day Data Retention. For more details, see our data retention conceptual docs. Notice that these graphs look identical, which will come into play later in the tutorial.
LangSmith Traces usage is measured per workspace, because workspaces often represent development environments (as in our example), or teams within an organization. As a LangSmith administrator, we want to understand spend granularly per each of these units. In this case where we just want to cut spend, we can focus on the environment responsible for the majority of costs first for the greatest savings.
LangSmith's Usage Graph and Invoice use the term tenant_id to refer to a workspace ID. They are interchangeable.
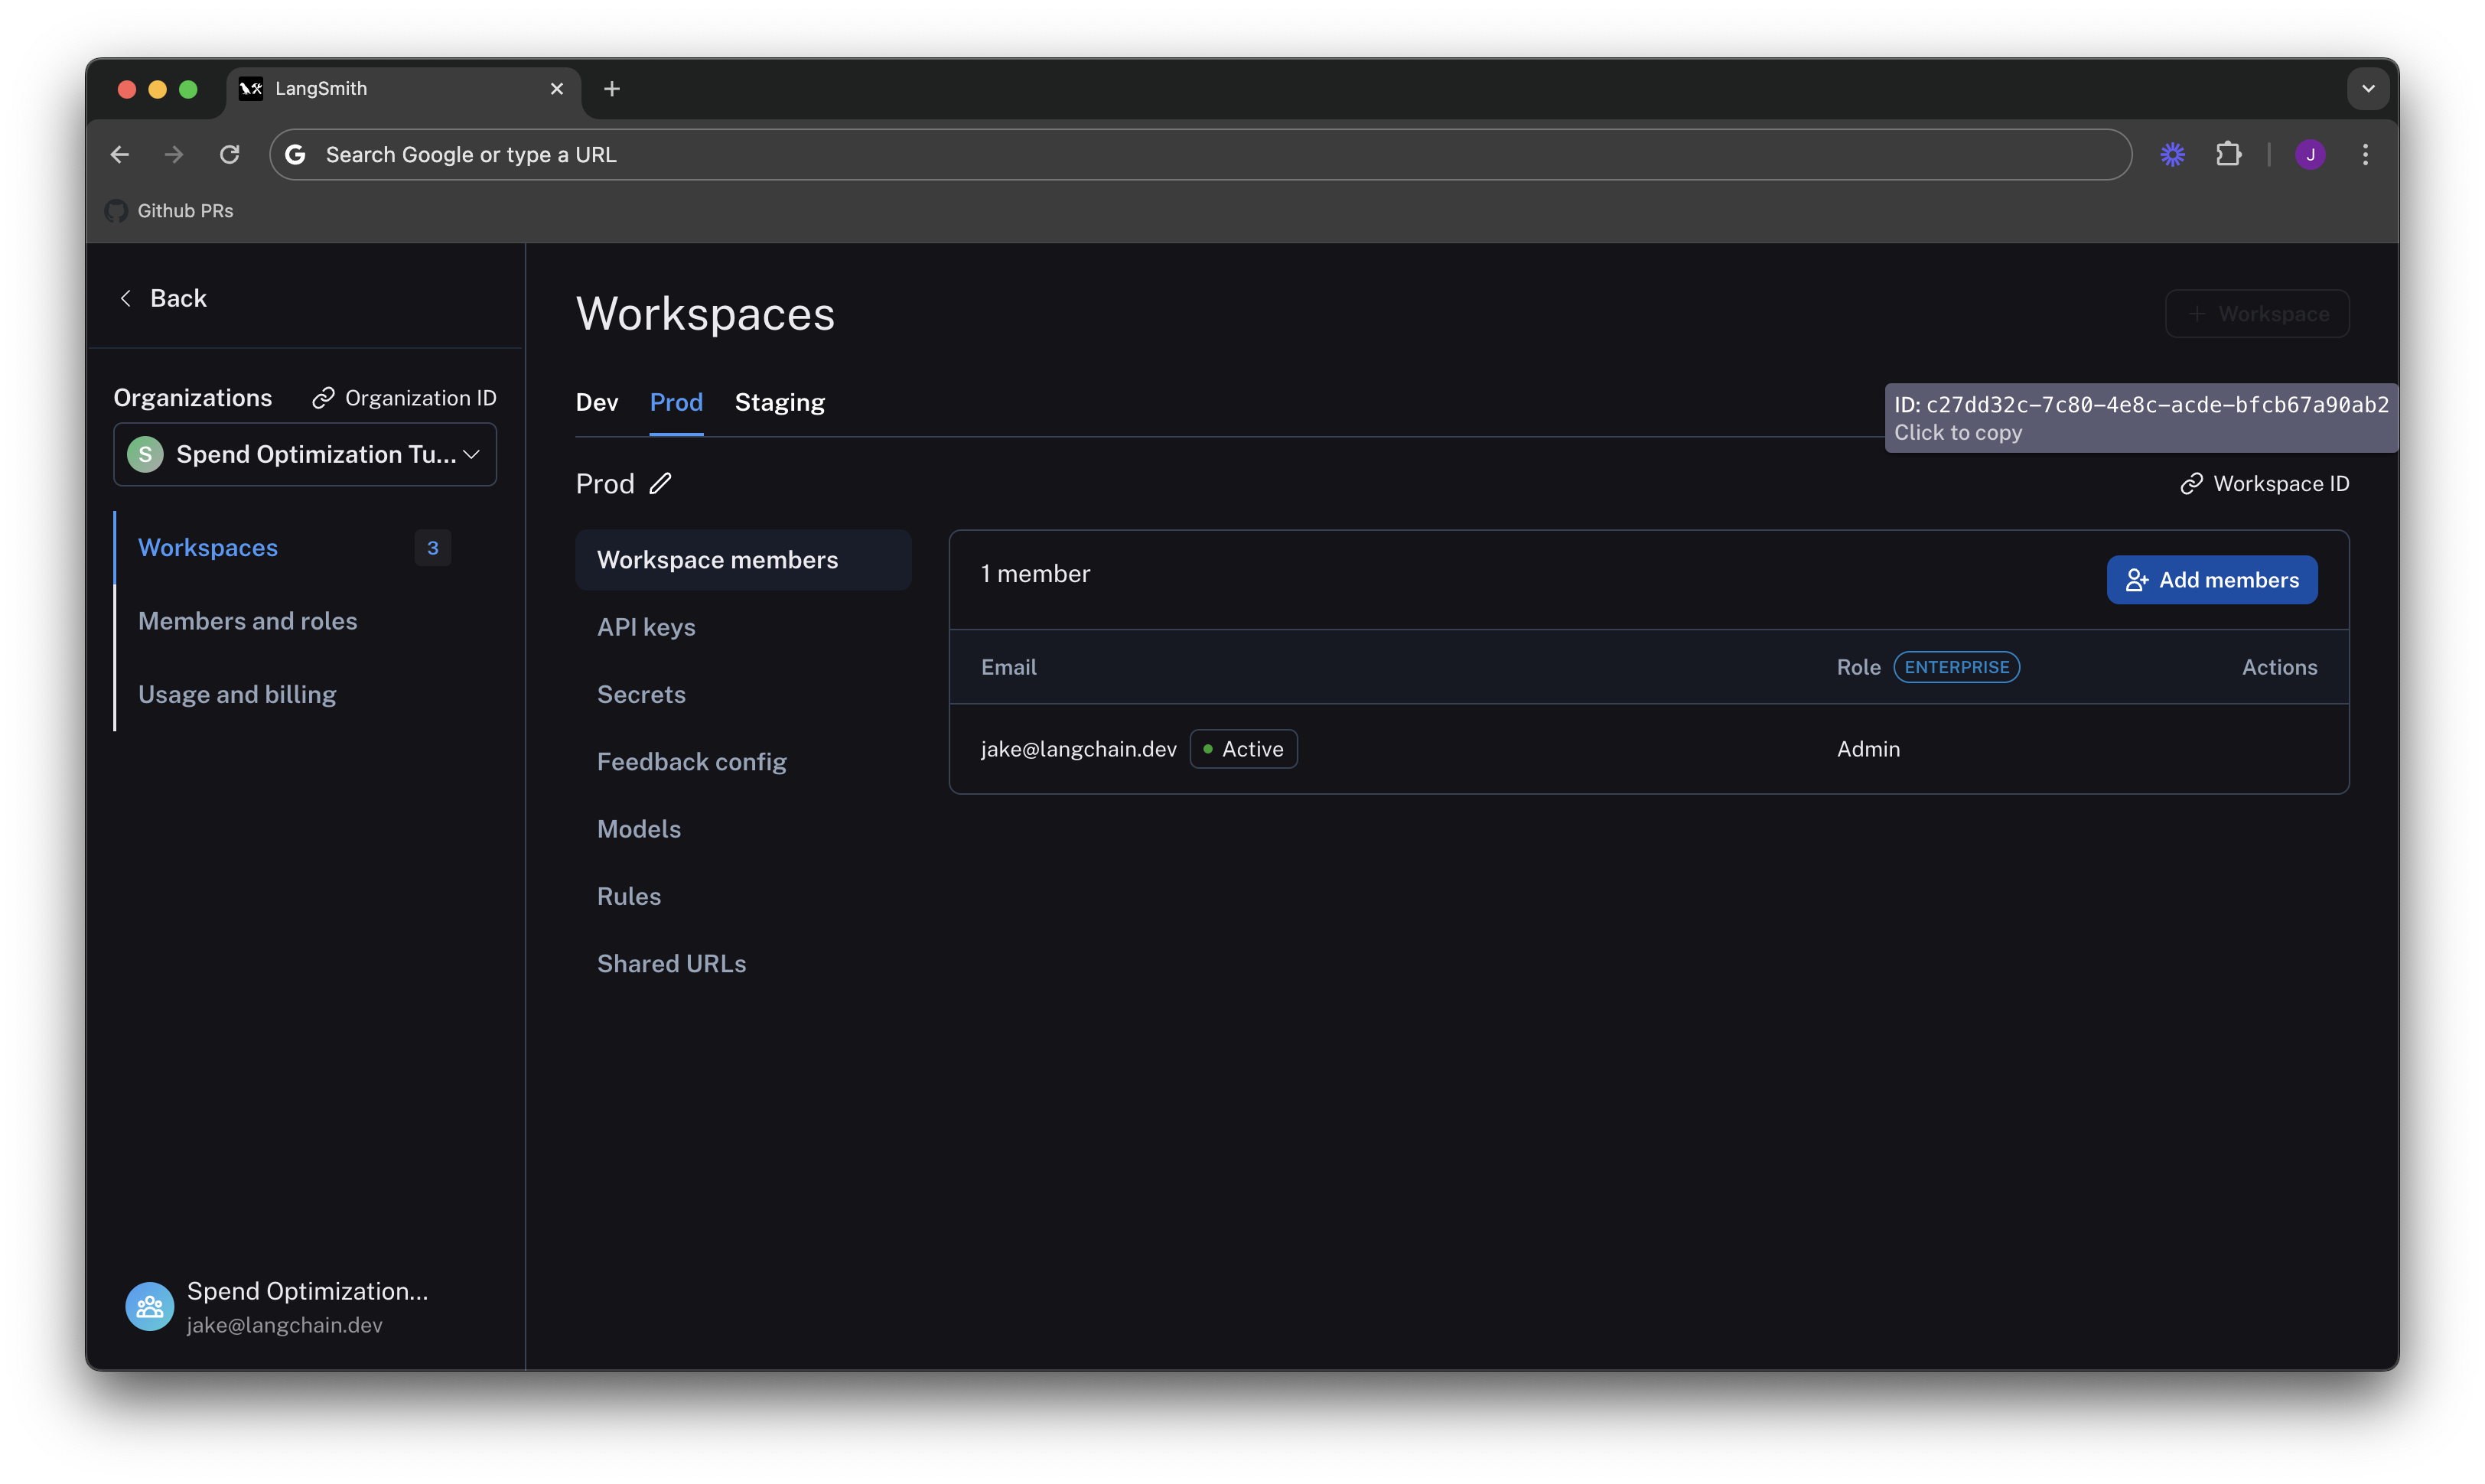
In the above image, the vast majority of usage is in the workspace with ID c27dd32c-7c80-4e8c-acde-bfcb67a90ab2. We can
go to Settings -> Workspaces, and hover our mouse over the Workspace ID button to find the one with a matching ID. In
this case, it's the Prod workspace:
Invoices
We understand what usage looks like in terms of traces, but we now need to translate that into spend. To do so,
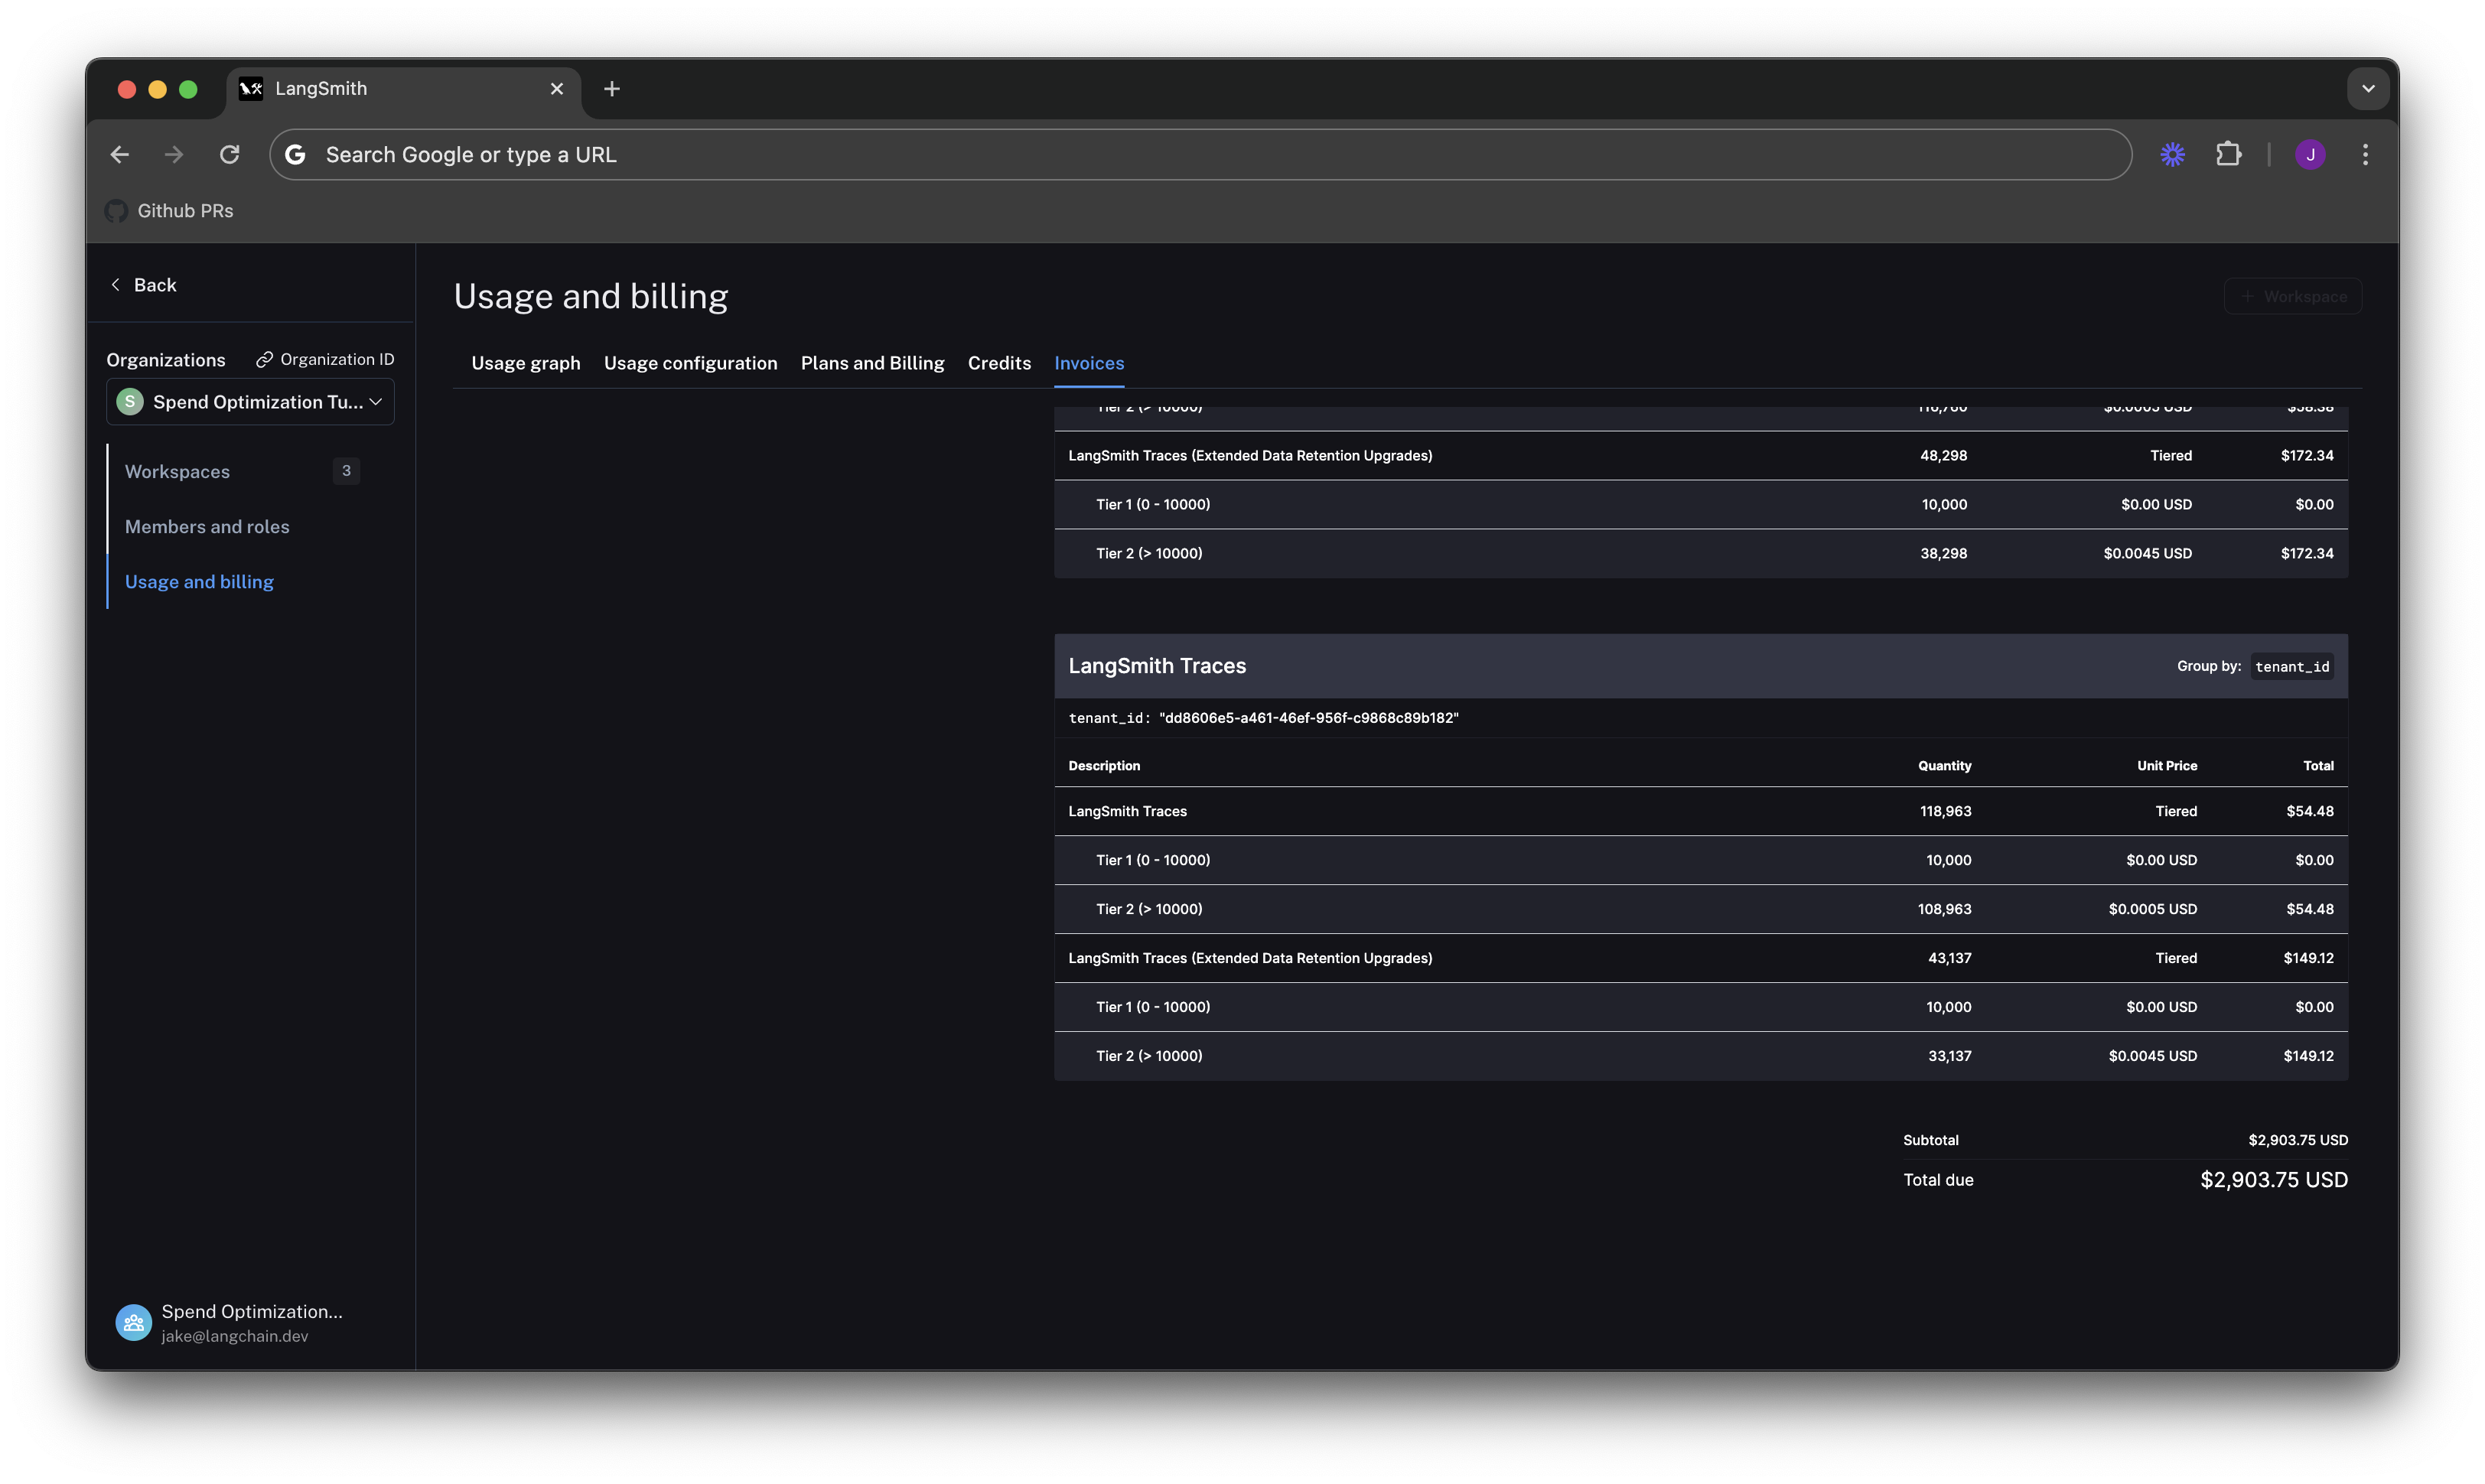
we head to the Invoices tab. The first invoice that will appear on screen is a draft of your current month's
invoice, which shows your running spend thus far this month.
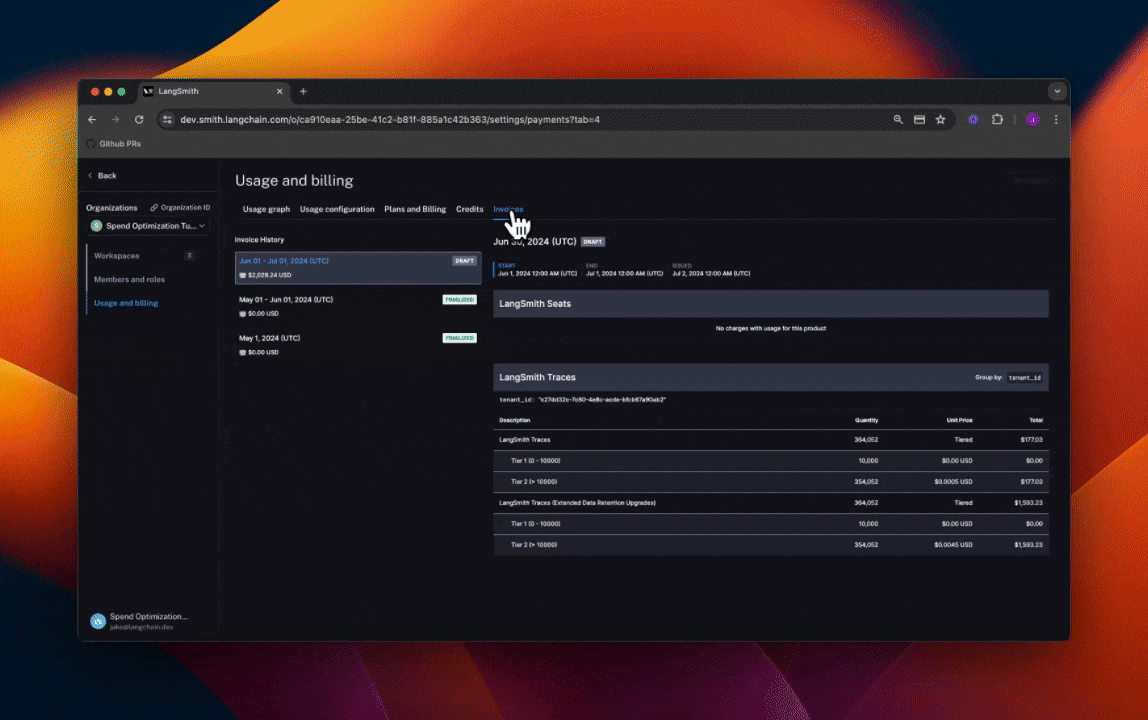
In the above GIF, we see that the charges for LangSmith Traces are broken up by "tenant_id" (i.e. Workspace ID), meaning we can track tracing spend on each of our workspaces. In the first few days of June, the vast majority of the total spend of ~$2,000 is in our production workspace. Further, the majority of spend in that workspace was on extended data retention trace upgrades.
These upgrades occur for two reasons:
- You use extended data retention tracing, meaning that, by default, your traces are retained for 400 days
- You use base data retention tracing, and use a feature that automatically extends the data retention of a trace (see our Auto-Upgrade conceptual docs)
Given that the number of total traces per day is equal to the number of extended retention traces per day, it's most likely the case that this org is using extended data retention tracing everywhere. As such, we start by optimizing our retention settings.
Optimization 1: manage data retention
LangSmith charges differently based on a trace's data retention (see our data retention conceptual docs), where short-lived traces are an order of magnitude less expensive than ones that last for a long time. In this optimization, we will show how to get optimal settings for data retention without sacrificing historical observability, and show the effect it has on our bill.
Change org level retention defaults for new projects
We navigate to the Usage configuration tab, and look at our organization level retention settings. Modifying this setting affects all new projects that are
created going forward in all workspaces in our org.
For backwards compatibility, older organizations may have this defaulted to Extended. Organizations created after June 3rd have this defaulted to Base.
Change project level retention defaults
Our existing projects have not changed their data retention settings, so we can change these on the individual project pages.
We navigate to Projects -> <your project name>, click the data retention drop down, and modify it to base retention. As
with the organization level setting, this will only affect retention (and pricing) for traces going forward.

Keep around a percentage of traces for extended data retention
We may not want all our traces to expire after 14 days if we care about historical debugging. As such, we can take advantage of LangSmith's built in ability to do server side sampling for extended data retention.
Choosing the right percentage of runs to sample depends on your use case. We will arbitrarily pick 10% of runs here, but will leave it to the user to find the right value that balances collecting rare events and cost constraints.
LangSmith automatically upgrades the data retention for any trace that matches a run rule in our automations product (see our run rules docs). On the
projects page, click Rules -> Add Rule, and configure the rule as follows:
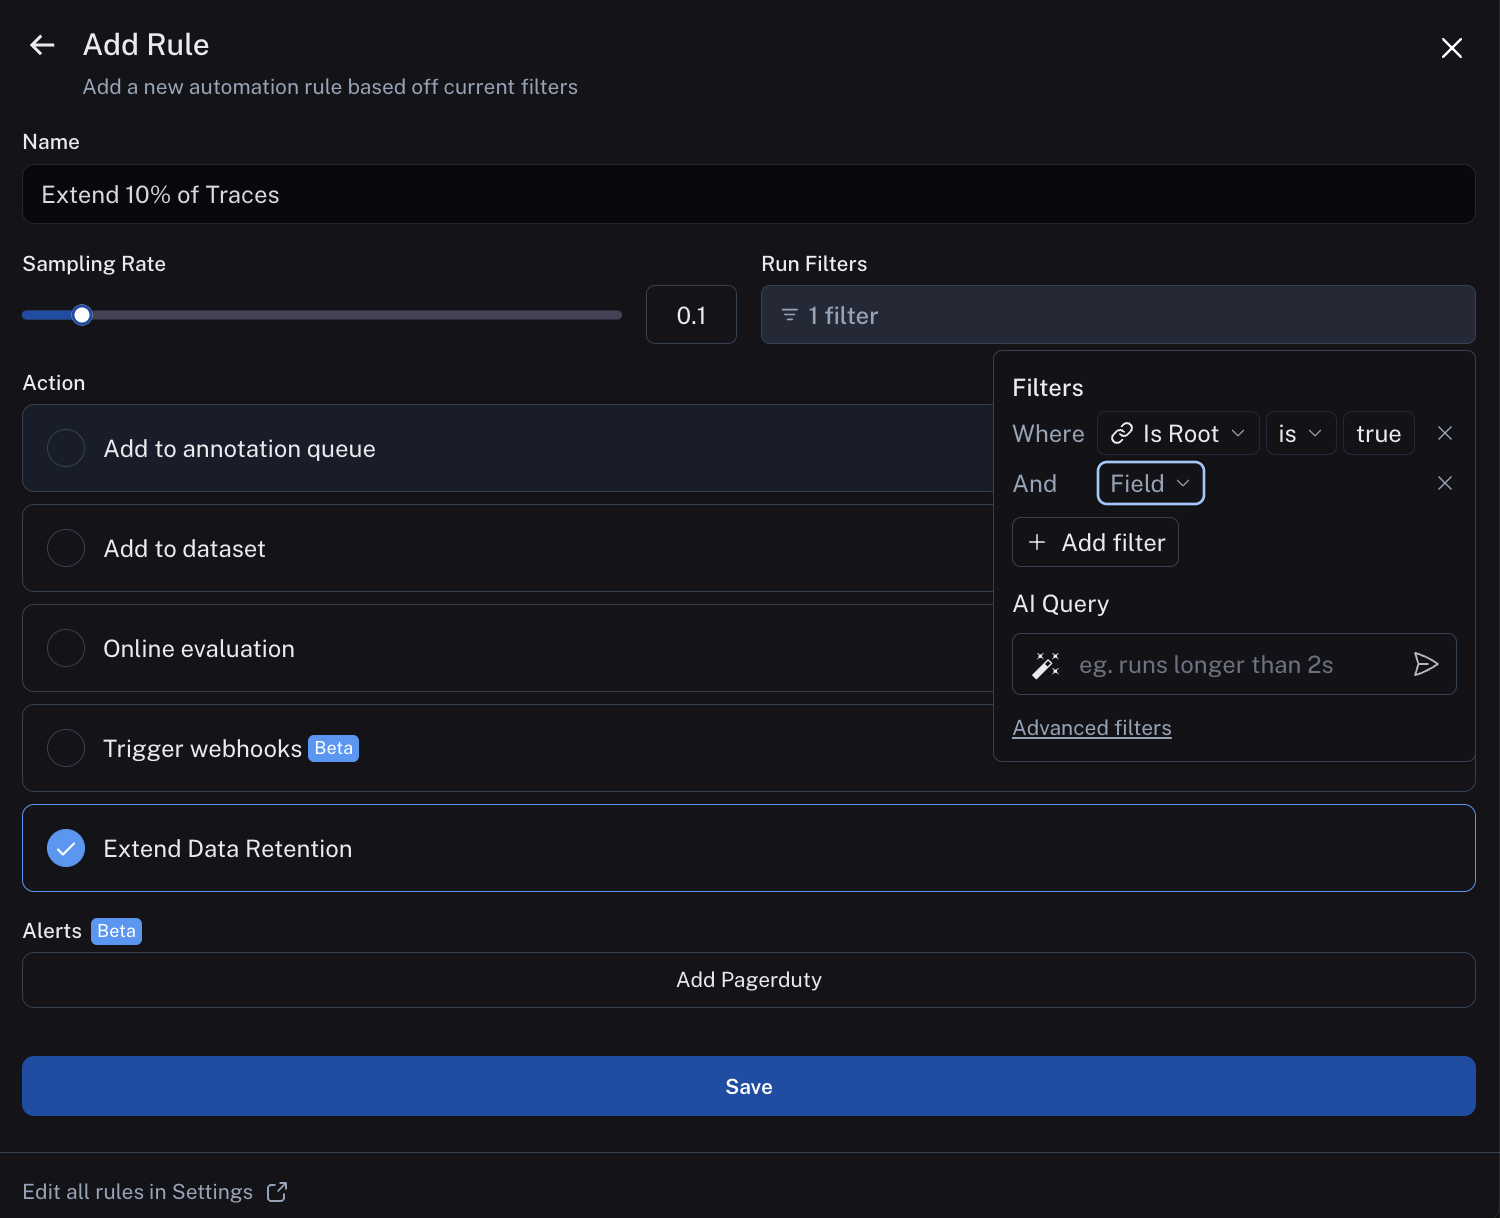
Run rules match on runs rather than traces. Runs are single units of work within an LLM application's API handling. Traces are end to end API calls (learn more about tracing concepts in LangSmith). This means a trace can be thought of as a tree of runs making up an API call. When a run rule matches any run within a trace, the trace's full run tree upgrades to be retained for 400 days.
Therefore, to make sure we have the proper sampling rate on traces, we take advantage of the filtering functionality of run rules.
We add add a filter condition to only match the "root" run in the run tree. This is distinct per trace, so our 10% sampling will upgrade 10% of traces, rather 10% of runs, which could correspond to more than 10% of traces. If desired, we can optionally add any other filtering conditions required (e.g. specific tags/metadata attached to our traces) for more pointed data retention extension. For the sake of this tutorial, we will stick with the simplest condition, and leave more advanced filtering as an exercise to the user.
If you want to keep a subset of traces for longer than 400 days for data collection purposes, you can create another run rule that sends some runs to a dataset of your choosing. A dataset allows you to store the trace inputs and outputs (e.g., as a key-value dataset), and will persist indefinitely, even after the trace gets deleted.
See results after 7 days
While the total amount of traces per day stayed the same, the extended data retention traces was cut heavily.
This translates to the invoice, where we've only spent about $900 in the last 7 days, as opposed to $2,000 in the previous 4. That's a cost reduction of nearly 75% per day!
Optimization 2: limit usage
In the previous section, we managed data retention settings to optimize existing spend. In this section, we will use usage limits to prevent future overspend.
LangSmith has two usage limits: total traces and extended retention traces. These correspond to the two metrics we've been tracking on our usage graph. We can use these in tandem to have granular control over spend.
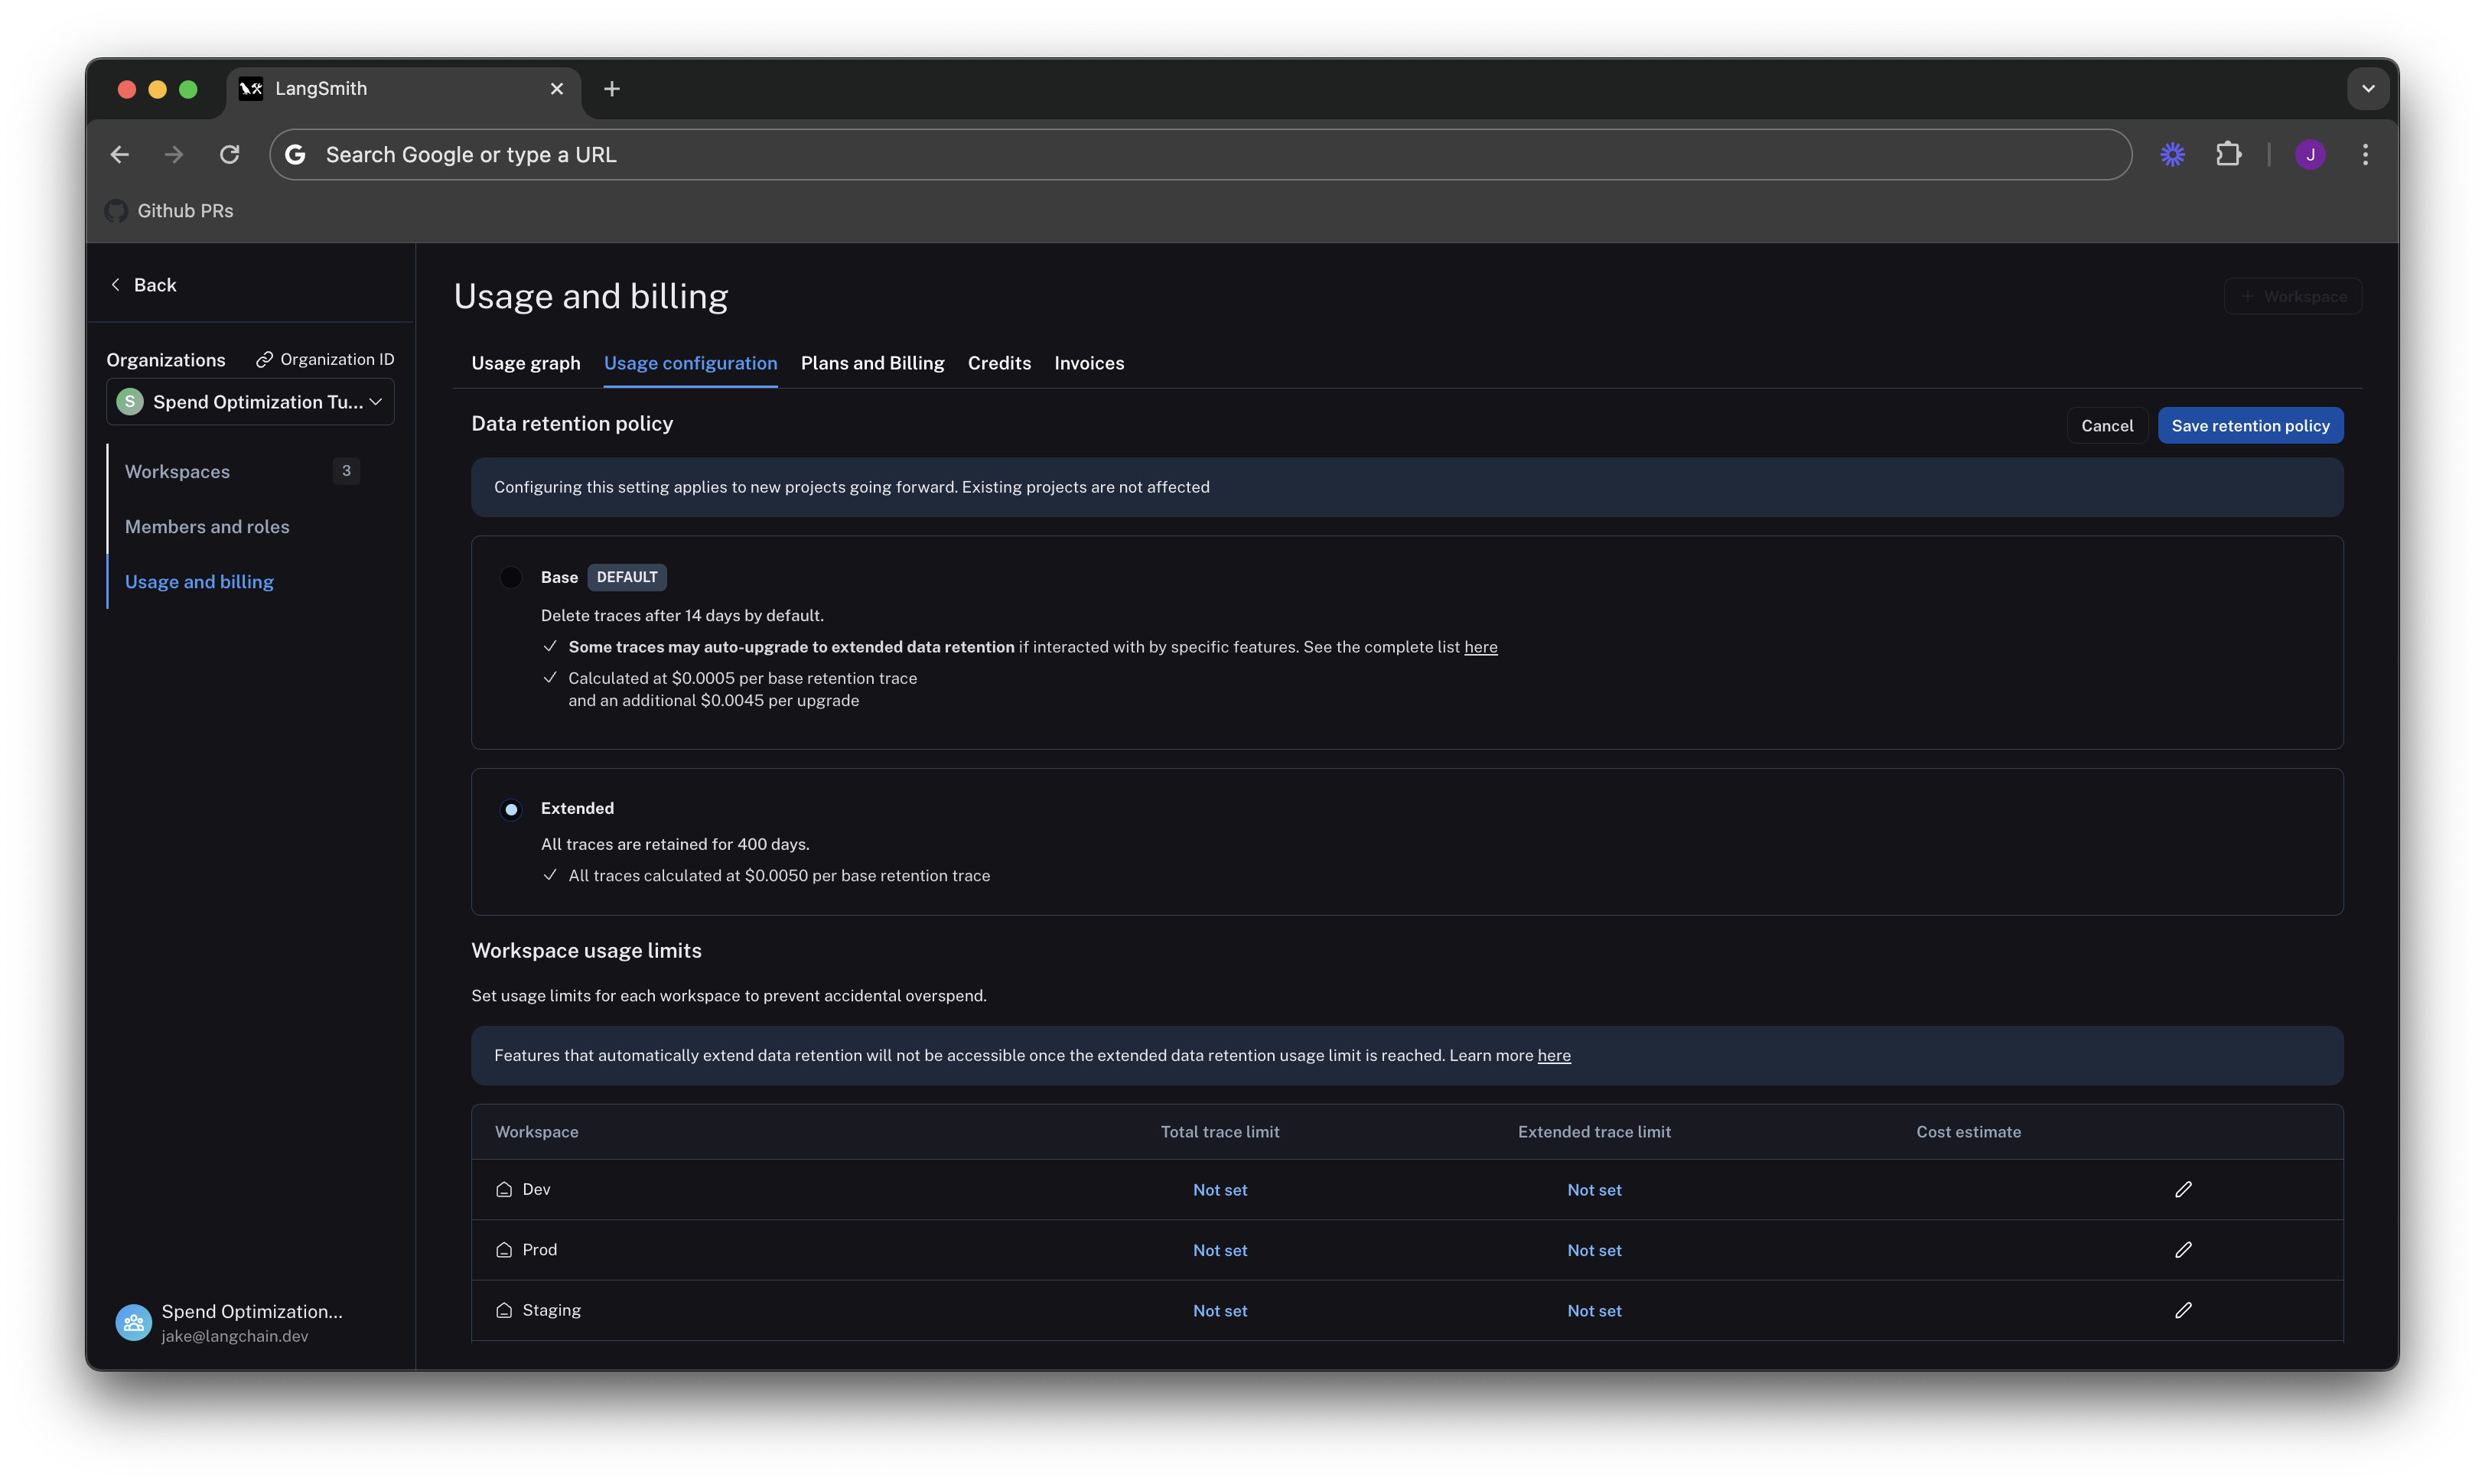
To set limits, we navigate back to Settings -> Usage and Billing -> Usage configuration. There is a table at the
bottom of the page that lets you set usage limits per workspace. For each workspace, the two limits appear, along
with a cost estimate:
![]()
Lets start by setting limits on our production usage, since that is where the majority of spend comes from.
Setting a good total traces limit
Picking the right "total traces" limit depends on the expected load of traces that you will send to LangSmith. You should clearly think about your assumptions before setting a limit.
For example:
- Current Load: Our gen AI application is called between 1.2-1.5 times per second, and each API request has a trace associated with it, meaning we log around 100,000-130,000 traces per day
- Expected Growth in Load: We expect to double in size in the near future.
From these assumptions, we can do a quick back-of-the-envelope calculation to get a good limit of:
limit = current_load_per_day * expected_growth * days/month
      = 130,000 * 2 * 30
      = 7,800,000 traces / month
We click on the edit icon on the right side of the table for our Prod row, and can enter this limit as follows:

When set without the extended data retention traces limit, the maximum cost estimator assumes that all traces are using extended data retention.
Cutting maximum spend with an extended data retention limit
If we are not a big enterprise, we may shudder at the ~$40k per month bill.
We saw from Optimization 1 that the easiest way to cut cost was through managing data retention.
The same can be said for limits. If we only want to keep ~10% of traces to be around more than 14 days, we can set a limit on the maximum
high retention traces we can keep. That would be .10 * 7,800,000 = 780,000.
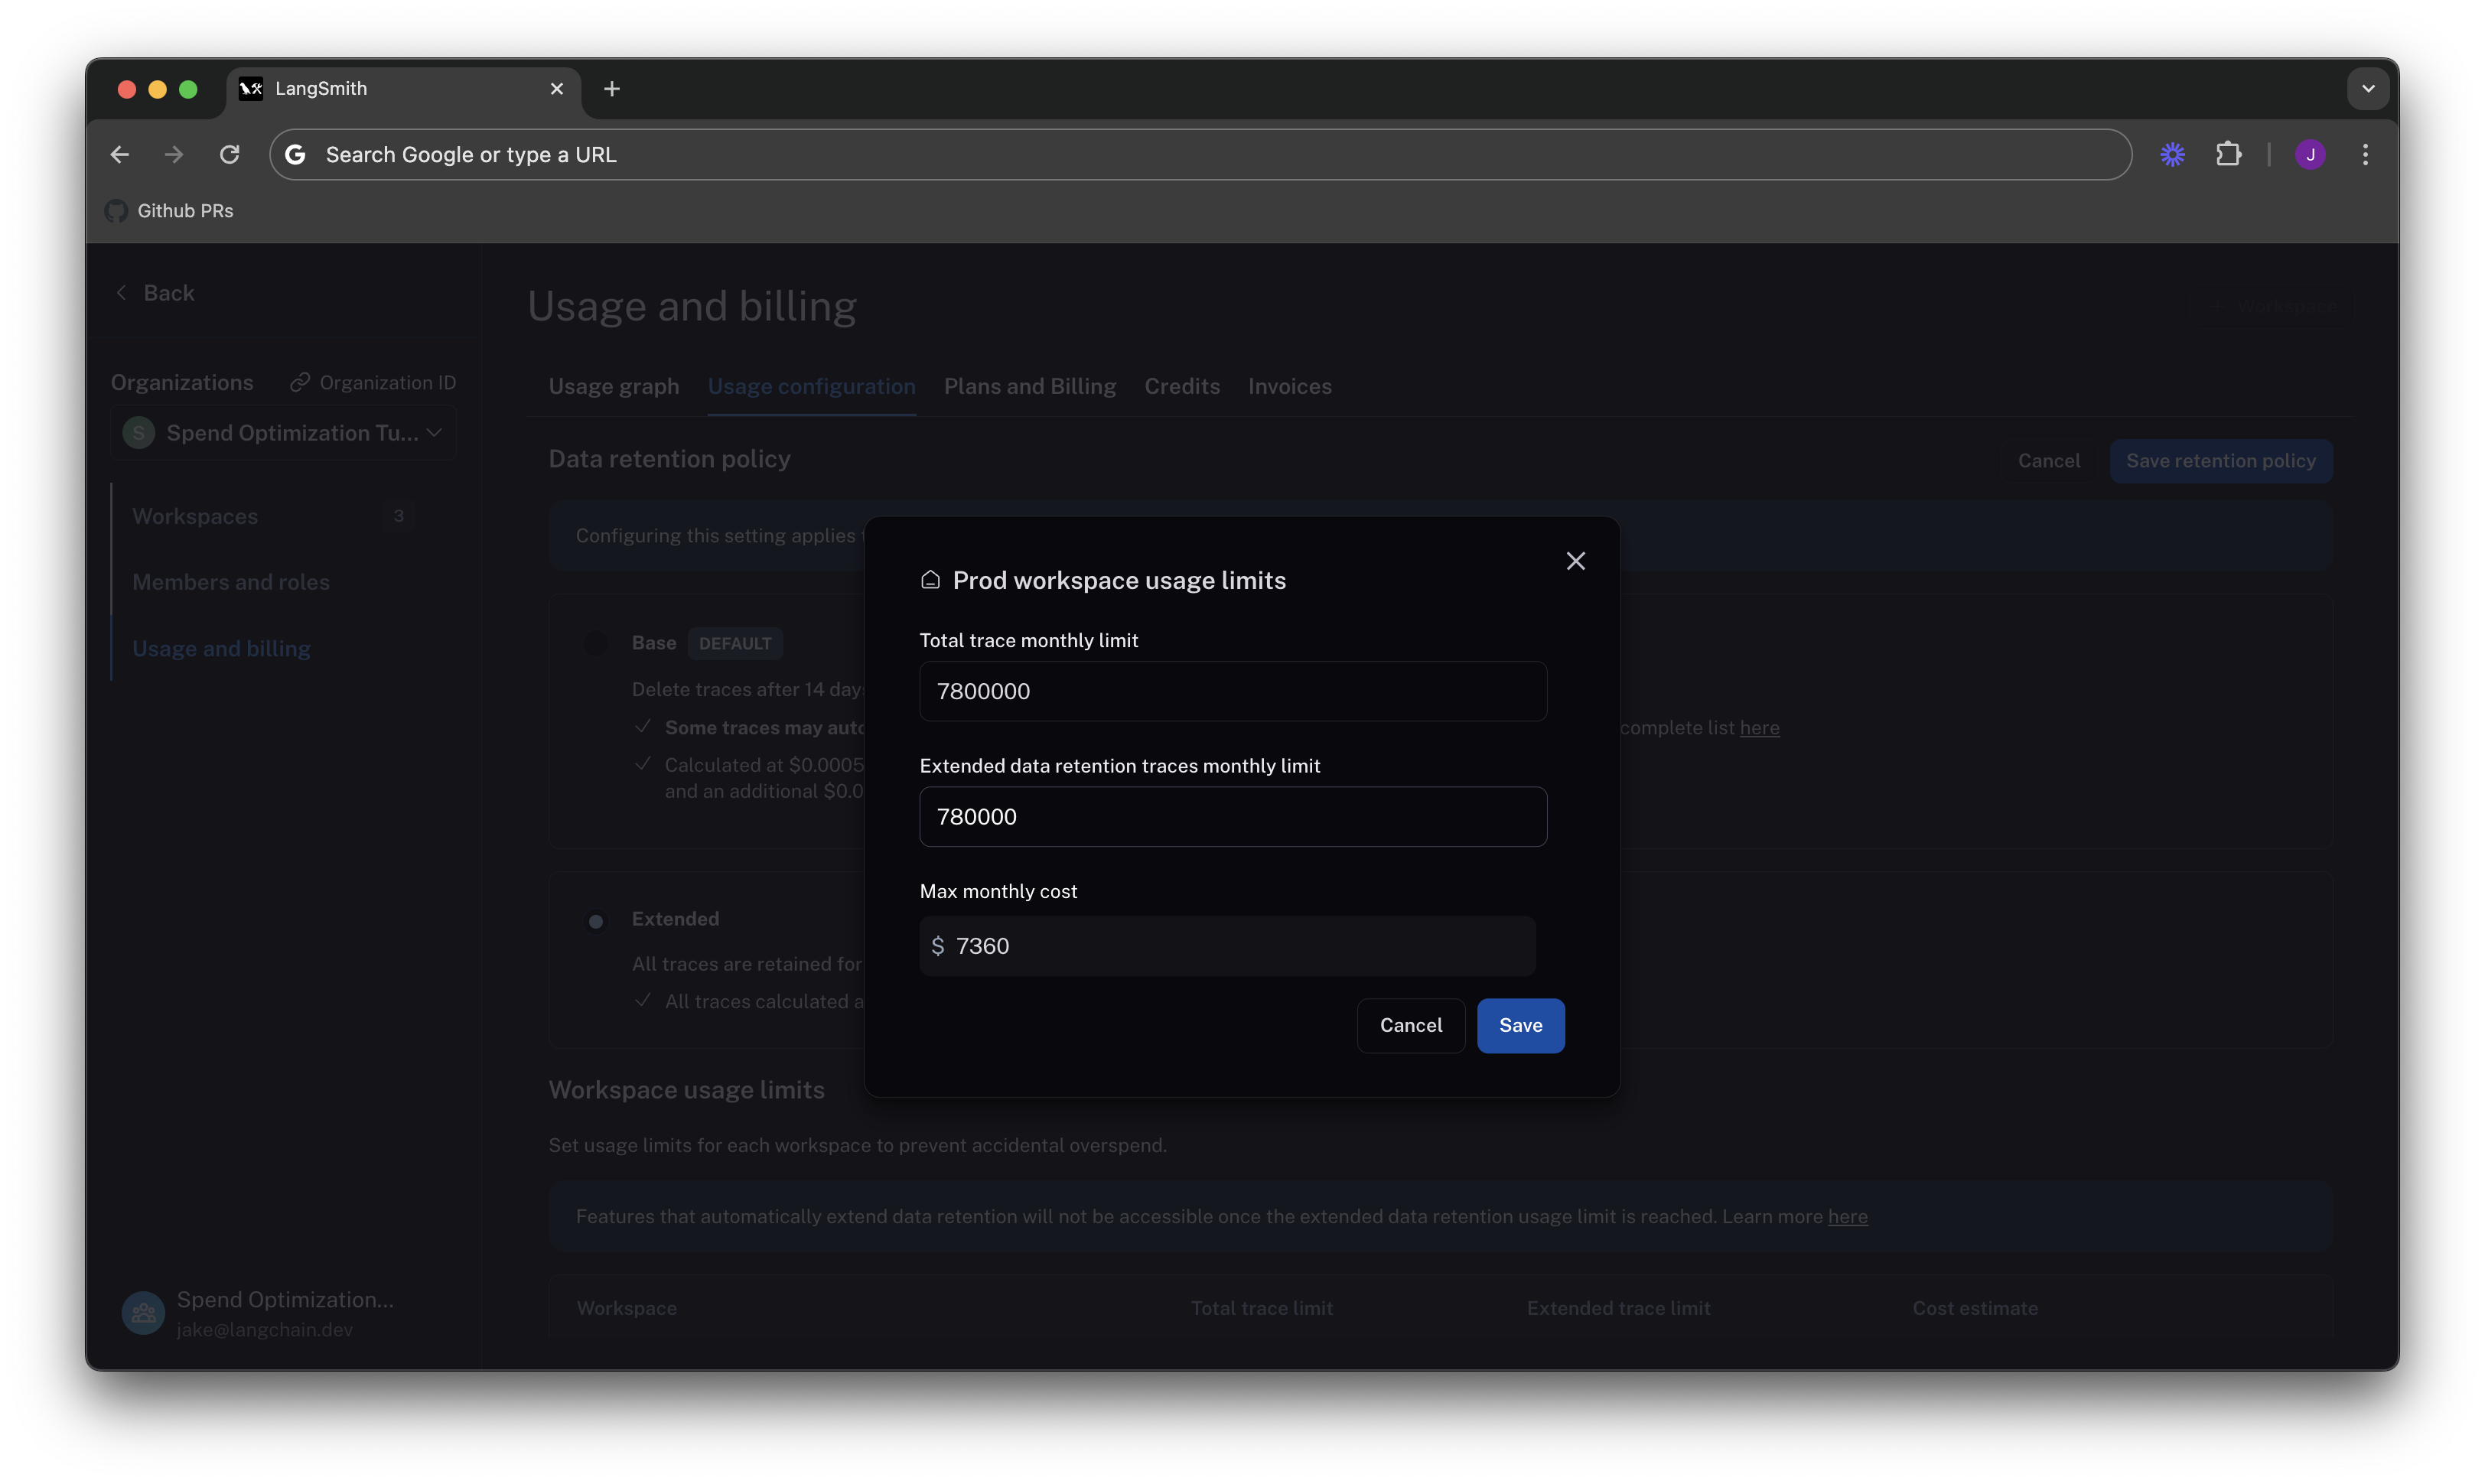
As we can see, the maximum cost is cut from ~40k per month to ~7.5k per month, because we no longer allow as many expensive data retention upgrades. This lets us be confident that new users on the platform will not accidentally cause cost to balloon.
The extended data retention limit can cause features other than traces to stop working once reached. If you plan to use this feature, please read more about its functionality here.
Set dev/staging limits and view total spent limit across workspaces
Following the same logic for our dev and staging environments, we set limits at 10% of the production limit on usage for each workspace.
While this works with our usage pattern, setting good dev and staging limits may vary depending on your use case with LangSmith. For example, if you run evals as part of CI/CD in dev or staging, you may want to be more liberal with your usage limits to avoid test failures.
Now that our limits are set, we can see that LangSmith shows a maximum spend estimate across all workspaces:
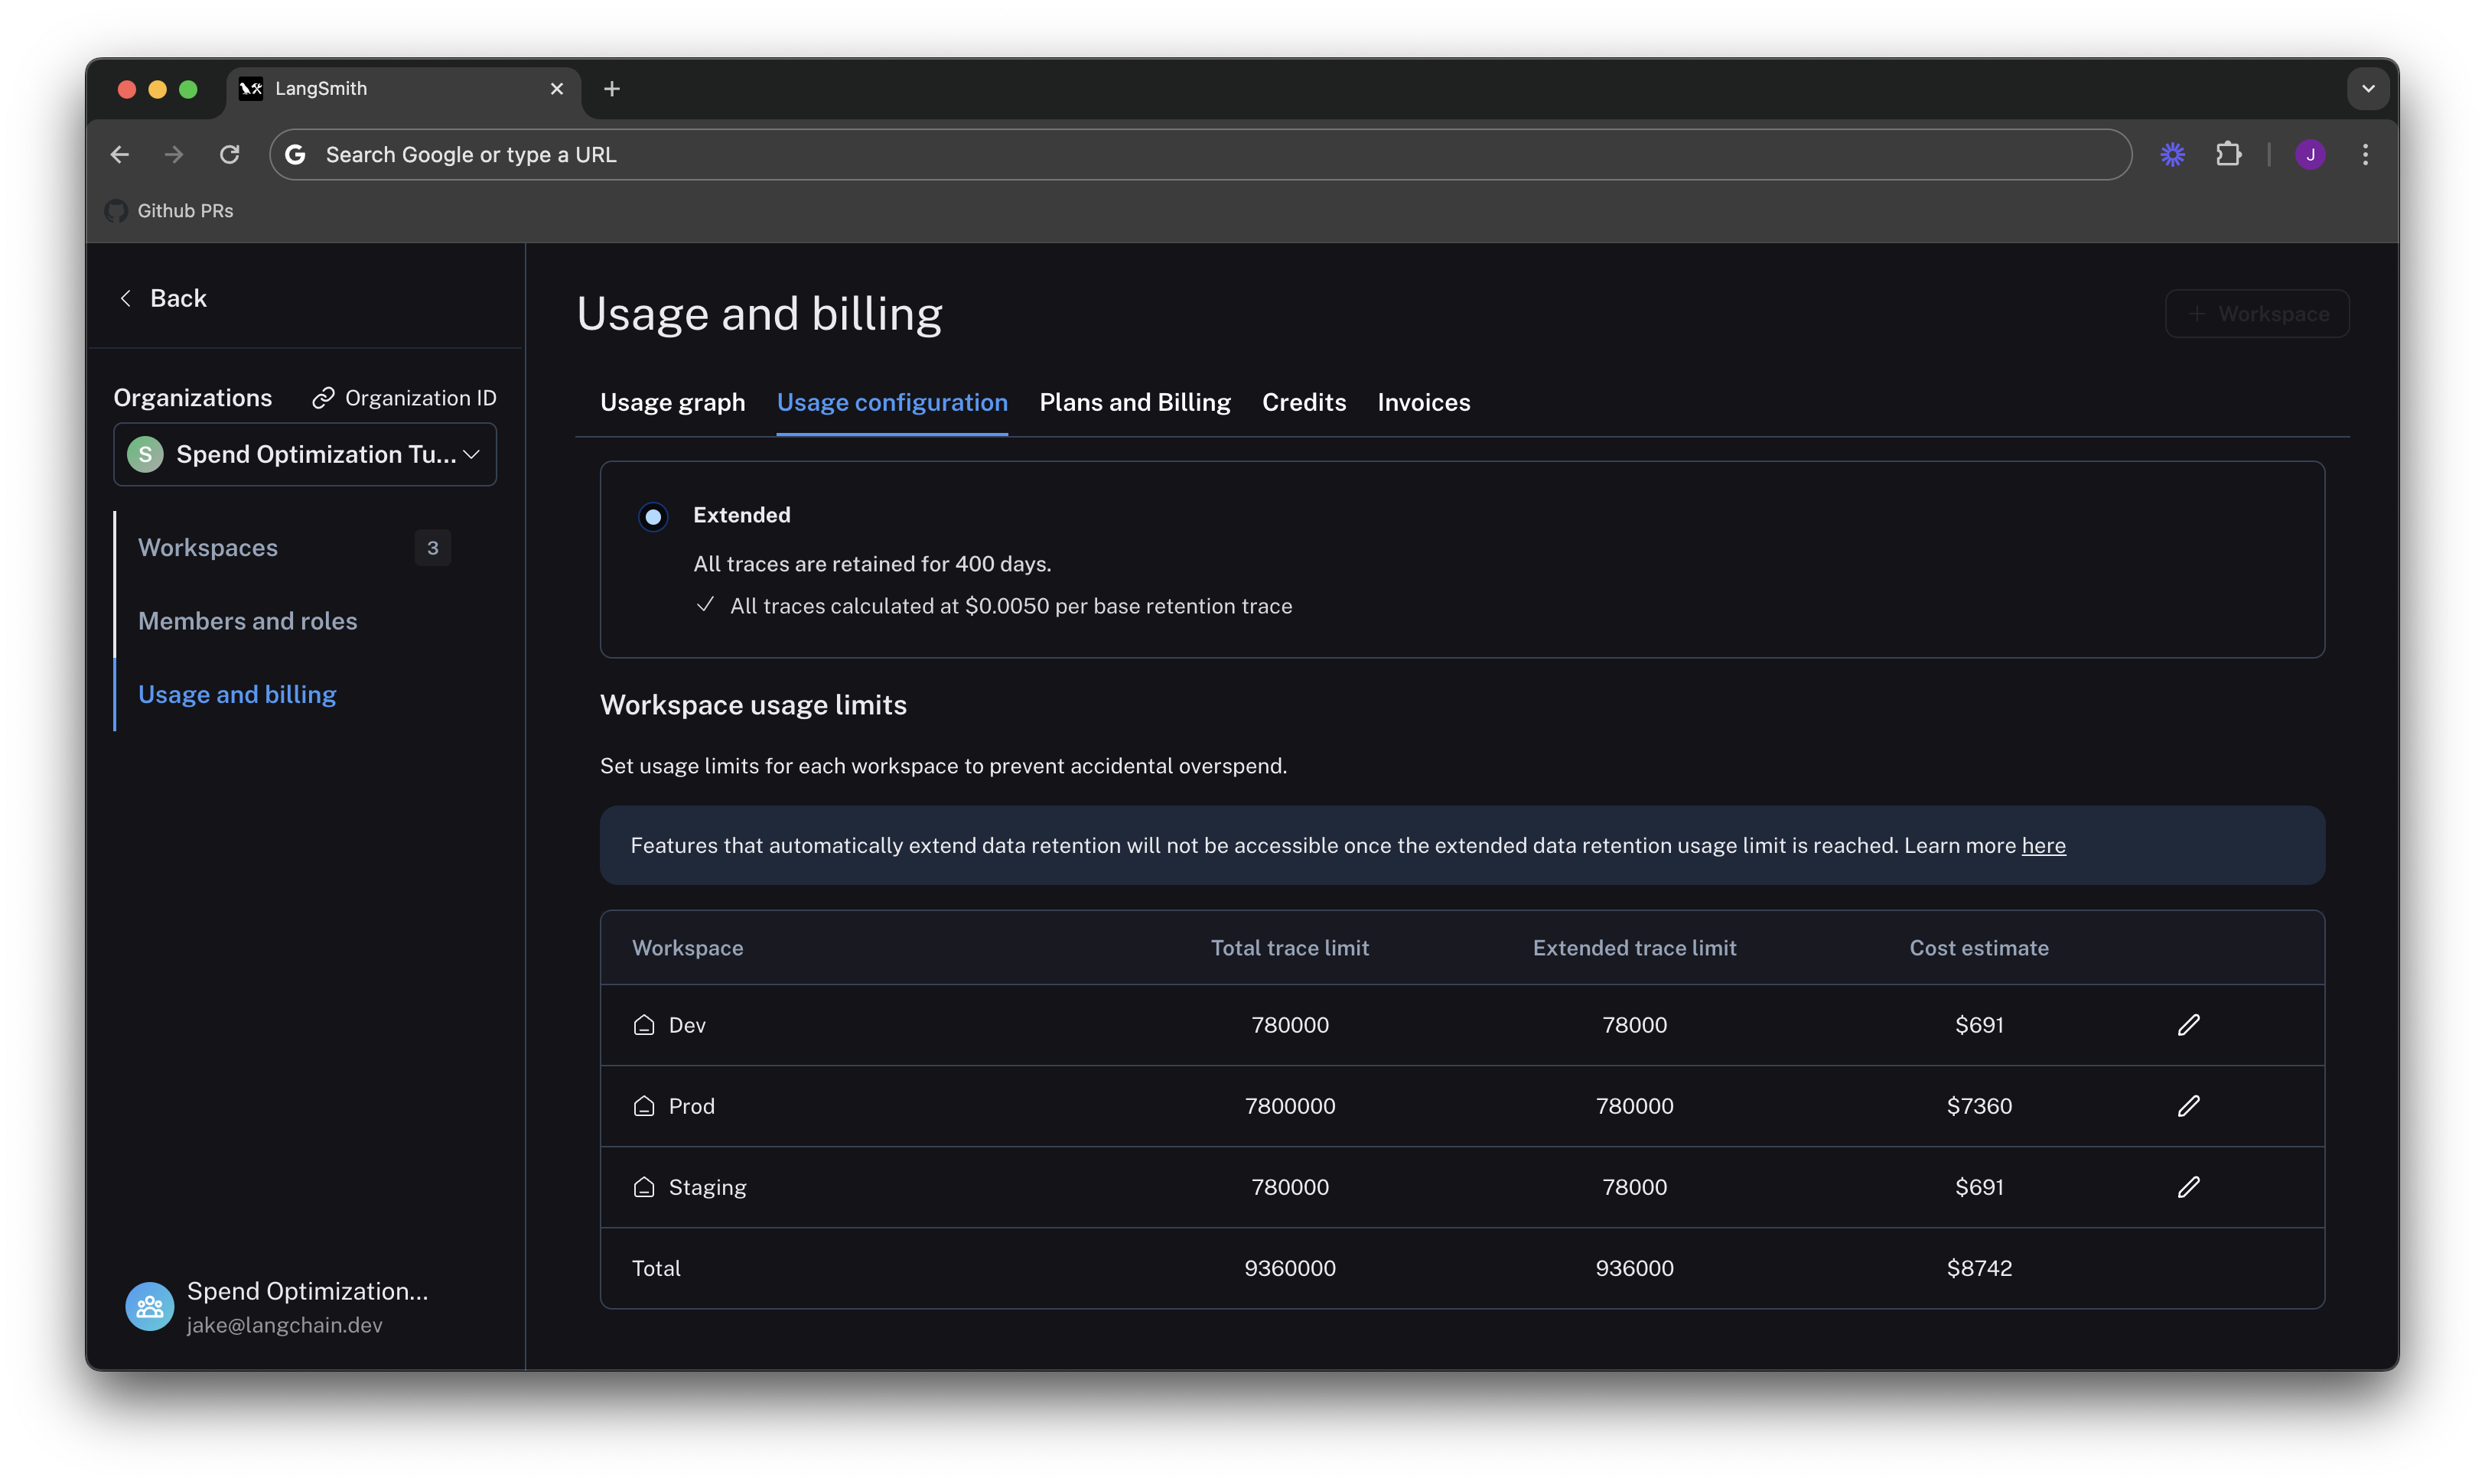
With this estimator, we can be confident that we will not end up with an unexpected credit card bill at the end of the month.
Summary
In this tutorial, we learned how to:
- Cut down our existing costs with data retention policies
- Prevent future overspend with usage limits
If you have questions about further optimizing your spend, please reach out to support@langchain.dev.