Configuring Webhook Notifications for LangSmith Alerts
Overview
This guide details the process for setting up webhook notifications for LangSmith alerts. Before proceeding, make sure you have followed the steps leading up to the notification step of creating the alert by following this guide. Webhooks enable integration with custom services and third-party platforms by sending HTTP POST requests when alert conditions are triggered. Use webhooks to forward alert data to ticketing systems, chat applications, or custom monitoring solutions.
Prerequisites
- An endpoint that can receive HTTP POST requests
- Appropriate authentication credentials for your receiving service (if required)
Integration Configuration
Step 1: Prepare Your Receiving Endpoint
Before configuring the webhook in LangSmith, ensure your receiving endpoint:
- Accepts HTTP POST requests
- Can process JSON payloads
- Is accessible from external services
- Has appropriate authentication mechanisms (if required)
Additionally, if on a custom deployment of LangSmith, make sure there are no firewall settings blocking egress traffic from LangSmith services.
Step 2: Configure Webhook Parameters
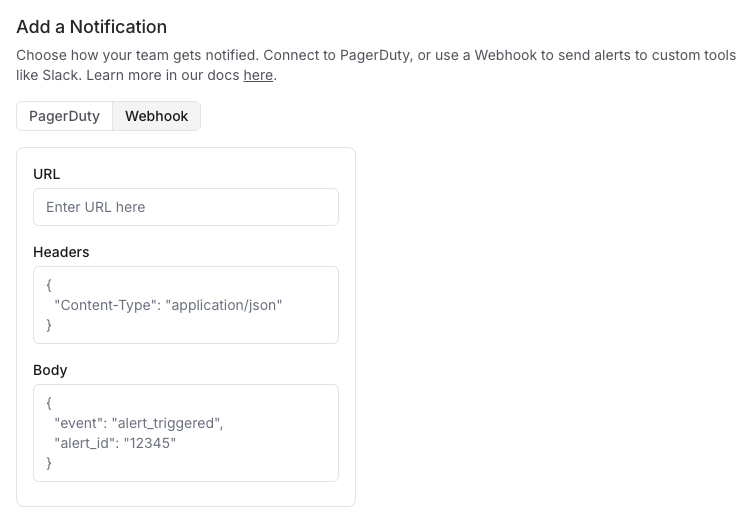
In the notification section of your alert complete the webhook configuration with the following parameters:
Required Fields
- URL: The complete URL of your receiving endpoint
- Example:
https://api.example.com/incident-webhook
- Example:
Optional Fields
-
Headers: JSON Key-value pairs sent with the webhook request
- Common headers include:
Authorization: For authentication tokensContent-Type: Usually set toapplication/json(default)X-Source: To identify the source as LangSmith
- If no headers, then simply use
{}
- Common headers include:
-
Request Body Template: Customize the JSON payload sent to your endpoint
- Default: LangSmith sends the payload defined and the following additonal key-value pairs appended to the payload:
project_name: Name of the triggered alertalert_rule_id: A UUID to identify the LangSmith alert. This can be used as a de-duplication key in the webhook service.alert_rule_name: The name of the alert rule.alert_rule_type: The type of alert (as of 04/01/2025 all alerts are of typethreshold).alert_rule_attribute: The attribute associated with the alert rule -error_count,feedback_scoreorlatency.triggered_metric_value: The value of the metric at the time the threshold was triggered.triggered_threshold: The threshold that triggered the alert.timestamp: The timestamp that triggered the alert.
- Default: LangSmith sends the payload defined and the following additonal key-value pairs appended to the payload:
Step 3: Test the Webhook
Click Send Test Alert to send the webhook notification to ensure the notification works as intended.
Troubleshooting
If webhook notifications aren't being delivered:
- Verify the webhook URL is correct and accessible
- Ensure any authentication headers are properly formatted
- Check that your receiving endpoint accepts POST requests
- Examine your endpoint's logs for received but rejected requests
- Verify your custom payload template is valid JSON format
Security Considerations
- Use HTTPS for your webhook endpoints
- Implement authentication for your webhook endpoint
- Consider adding a shared secret in your headers to verify webhook sources
- Validate incoming webhook requests before processing them
Sending alerts to Slack using a webhook
Here is an example for configuring LangSmith alerts to send notifications to Slack channels using the chat.postMessage API.
Prerequisites
- Access to a Slack workspace
- A LangSmith project to set up alerts
- Permissions to create Slack applications
Step 1: Create a Slack App
- Visit the Slack API Applications page
- Click Create New App
- Select From scratch
- Provide an App Name (e.g., "LangSmith Alerts")
- Select the workspace where you want to install the app
- Click Create App
Step 2: Configure Bot Permissions
- In the left sidebar of your Slack app configuration, click OAuth & Permissions
- Scroll down to Bot Token Scopes under Scopes and click Add an OAuth Scope
- Add the following scopes:
chat:write(Send messages as the app)chat:write.public(Send messages to channels the app isn't in)channels:read(View basic channel information)
Step 3: Install the App to Your Workspace
- Scroll up to the top of the OAuth & Permissions page
- Click Install to Workspace
- Review the permissions and click Allow
- Copy the Bot User OAuth Token that appears (begins with
xoxb-)
Step 4: Configure the Webhook Alert in LangSmith
- In LangSmith, navigate to your project
- Select Alerts → Create Alert
- Define your alert metrics and conditions
- In the notification section, select Webhook
- Configure the webhook with the following settings:
Webhook URL
https://slack.com/api/chat.postMessage
Headers
{
  "Content-Type": "application/json",
  "Authorization": "Bearer xoxb-your-token-here"
}
Note: Replace
xoxb-your-token-herewith your actual Bot User OAuth Token
Request Body Template
{
  "channel": "{channel_id}",
  "text": "{alert_name} triggered for {project_name}",
  "blocks": [
    {
      "type": "section",
      "text": {
        "type": "mrkdwn",
        "text": "🚨{alert_name} has been triggered"
      }
    },
    {
      "type": "section",
      "text": {
        "type": "mrkdwn",
        "text": "Please check the following link for more information:"
      }
    },
    {
      "type": "section",
      "text": {
        "type": "mrkdwn",
        "text": "<{project-url}|View in LangSmith>"
      }
    }
  ]
}
NOTE: Fill in the channel_id, alert_name, project_name and project_url when creating the alert. You can find your project_url in the browser's URL bar. Copy the portion up to but not including any query parameters.
- Click Save to activate the webhook configuration
Step 5: Test the Integration
- In the LangSmith alert configuration, click Test Alert
- Check your specified Slack channel for the test notification
- Verify that the message contains the expected alert information
(Optional) Step 6: Link to the Alert Preview in the Request Body
After creating an alert, you can optionally link to its preview in the webhook's request body.
To configure this:
- Save your alert
- Find your saved alert in the alerts table and click it
- Copy the dsiplayed URL
- Click "Edit Alert"
- Replace the existing project URL with the copied alert preview URL