SCIM User Provisioning
System for Cross-domain Identity Management (SCIM) is an open standard that allows for the automation of user provisioning. Using SCIM, you can automatically provision and deprovision users in your LangSmith organization and workspaces, keeping user access synchronized with your organization's identity provider.
SCIM is available for organizations on the Enterprise plan. Please contact sales to learn more.
SCIM is available on Helm chart versions 0.10.41 (application version 0.10.108) and later.
SCIM support is API-only (see instructions below).
What is SCIM?
SCIM enables automatic user provisioning and deprovisioning between your identity provider (IdP) and LangSmith. This eliminates the need for manual user management and ensures that user access is always up-to-date with your organization's identity system.
Benefits of SCIM
- Automated user management: Users are automatically added, updated, and removed from LangSmith based on their status in your IdP
- Reduced administrative overhead: No need to manually manage user access across multiple systems
- Improved security: Users who leave your organization are automatically deprovisioned from LangSmith
- Consistent access control: User attributes and group memberships are synchronized between systems
- Scalable: Efficiently manage large teams with many workspaces and custom roles
Supported Features
SCIM enables the following capabilities:
- User provisioning: Automatically add users to your LangSmith organization
- User deprovisioning: Automatically remove users from your organization
- Attribute synchronization: Keep user attributes (like full name) synchronized between your IdP and LangSmith
- Group-based access: Sync membership from IdP user groups to LangSmith workspaces
- Role assignment: Select specific Organization Roles and Workspace Roles for groups of users
SCIM is supported for these authentication methods:
- Cloud: SAML SSO
- Self-hosted: OAuth2.0 with Client Secret
Requirements
Prerequisites
- Your organization must be on an Enterprise plan.
- Your Identity Provider (IdP) must support SCIM 2.0.
- Only Organization Admins can configure SCIM.
- For cloud customers: SAML SSO must be configurable for your organization.
- For self-hosted customers: OAuth with Client Secret authentication mode must be enabled.
- For self-hosted customers, network traffic must be allowed from the identity provider to LangSmith:
Role Precedence
When a user belongs to multiple groups for the same workspace, the following precedence applies:
- Organization Admin groups take highest precedence - users in these groups will be
Adminin all workspaces - Most recently-created workspace-specific group takes precedence over other workspace groups
When a group is deleted or a user is removed from a group, their access is updated according to their remaining group membership, following the precedence rules above.
SCIM group membership will override manually-assigned roles or roles assigned via Just-in-Time (JIT) provisioning. We recommend disabling JIT provisioning to avoid conflicts.
Email Verification
In cloud only, creating a new user with SCIM triggers an email to the user. They must verify their email address by clicking the link in this email. The link expires in 24 hours, and can be resent if needed by removing and re-adding the user via SCIM.
Attributes and Mapping
Group Naming Convention
Group membership maps to LangSmith Workspace membership and workspace roles with a specific naming convention:
Organization Admin Groups
Format: <optional_prefix>Organization Admin or <optional_prefix>Organization Admins
Examples:
LS:Organization AdminsGroups-Organization AdminsOrganization Admin
Workspace-Specific Groups
Format: <optional_prefix><org_role_name>:<workspace_name>:<workspace_role_name>
Examples:
LS:Organization User:Production:AnnotatorsGroups-Organization User:Engineering:DevelopersOrganization User:Marketing:Viewers
Mapping
While specific instructions depending on the identity provider may vary, these mappings show what is supported by the LangSmith SCIM integration:
User Attributes
| LangSmith App Attribute | Identity Provider Attribute | Matching Precedence |
|---|---|---|
userName1 | email address | |
active | !deactivated | |
emails[type eq "work"].value | email address2 | |
name.formatted | displayName OR givenName + familyName3 | |
givenName | givenName | |
familyName | familyName | |
externalId | sub4 | 1 |
userNameis not required by LangSmith- Email address is required
- Use the computed expression if your
displayNamedoes not match the format ofFirstname Lastname - To avoid inconsistency, this should match the SAML
NameIDassertion (in cloud) and thesubOAuth2.0 claim (in self-hosted).
Group Attributes
| LangSmith App Attribute | Identity Provider Attribute | Matching Precedence |
|---|---|---|
displayName | displayName1 | 1 |
externalId | objectId | |
members | members |
- Groups must follow the naming convention described in the Group Naming Convention section.
If your company has a group naming policy, you should instead map from the
descriptionidentity provider attribute and set the description based on the Group Naming Convention section.
Configuration Steps
Step 1: Configure SAML SSO (Cloud only)
There are two scenarios for SAML SSO configuration:
- If SAML SSO is already configured for your organization, you should skip the steps to initially add the application (Add application from Okta Integration Network or Create a new Entra ID application integration), as you already have an application configured and just need to enable provisioning.
- If you are configuring SAML SSO for the first time alongside SCIM, first follow the instructions to set up SAML SSO, then follow the instructions here to enable SCIM.
NameID Format
LangSmith uses the SAML NameID to identify users. The NameID is a required field in the SAML response and is case-insensitive.
The NameID must:
- Be unique to each user.
- Be a persistent value that never changes, such as a randomly generated unique user ID.
- Match exactly on each sign-in attempt. It should not rely on user input.
The NameID should not be an email address or username because Email addresses and usernames are more likely to change over time and can be case-sensitive.
The NameID format must be Persistent, unless you are using a field, like email, that requires a different format.
Step 2: Disable JIT Provisioning (Cloud only)
Before enabling SCIM, disable Just-in-Time (JIT) provisioning to prevent conflicts between automatic and manual user provisioning. Use the PATCH /orgs/current/info endpoint:
curl -X PATCH $LANGCHAIN_ENDPOINT/orgs/current/info \
  -H "X-Api-Key: $LANGCHAIN_API_KEY" \
  -H "Content-Type: application/json" \
  -d '{"jit_provisioning_enabled": false}'
Step 3: Generate SCIM Bearer Token
In self-hosted environments, the full URL below may look like https://langsmith.internal.corp.dev/api/v1/platform/orgs/current/scim/tokens (without subdomain, note the /api/v1 path prefix) or https://langsmith.internal.corp.dev/subdomain/api/v1/platform/orgs/current/scim/tokens (with subdomain) - see the ingress docs for more details.
Generate a SCIM Bearer Token for your organization. This token will be used by your IdP to authenticate SCIM API requests. Ensure env vars are set appropriately, for example:
curl -X POST $LANGCHAIN_ENDPOINT/v1/platform/orgs/current/scim/tokens \
  -H "X-Api-Key: $LANGCHAIN_API_KEY" \
  -H "X-Organization-Id: $LANGCHAIN_ORGANIZATION_ID" \
  -H "Content-Type: application/json" \
  -d '{"description": "Your description here"}'
Note that the SCIM Bearer Token value is not available outside of the response to this request. These additional endpoints are present:
GET /v1/platform/orgs/current/scim/tokensGET /v1/platform/orgs/current/scim/tokens/{scim_token_id}PATCH /v1/platform/orgs/current/scim/tokens/{scim_token_id}(only thedescriptionfield is supported)DELETE /v1/platform/orgs/current/scim/tokens/{scim_token_id}
Step 4: Configure your Identity Provider
If you use Azure Entra ID (formerly Azure AD) or Okta, there are specific instructions below for identity provider setup (Azure Entra ID, Okta). The requirements and steps above are applicable for all identity providers.
Azure Entra ID
For additional information, see Microsoft's documentation.
Step 1: Configure SCIM in your Enterprise Application
- Log in to the Azure portal with a privileged role (e.g. Global Administrator)
- Navigate to your existing LangSmith Enterprise Application
- In the left-side navigation, select
Manage > Provisioning - Click
Get started
Step 2: Configure Admin Credentials
- Under
Admin Credentials:- Tenant URL:
- US:
https://api.smith.langchain.com/scim/v2 - EU:
https://eu.api.smith.langchain.com/scim/v2 - Self-hosted:
<langsmith_url>/scim/v2
- US:
- Secret Token: Enter the SCIM Bearer Token generated in Step 3 above
- Tenant URL:
- Click
Test Connectionto verify the configuration - Click
Save
Step 3: Configure Attribute Mappings
Configure the following attribute mappings under Mappings:
User Attributes
Set Target Object Actions to Create and Update (start with Delete disabled for safety):
| LangSmith App Attribute | Microsoft Entra ID Attribute | Matching Precedence |
|---|---|---|
userName | userPrincipalName | |
active | Not([IsSoftDeleted]) | |
emails[type eq "work"].value | mail1 | |
name.formatted | displayName OR Join(" ", [givenName], [surname])2 | |
externalId | objectId3 | 1 |
- User's email address must be present in Entra ID
- Use the
Joinexpression if yourdisplayNamedoes not match the format ofFirstname Lastname - To avoid inconsistency, this should match the SAML NameID assertion and the
subOAuth2.0 claim. For SAML SSO in cloud, theUnique User Identifier (Name ID)required claim should beuser.objectIDand theName identifier formatshould bepersistent.
Group Attributes
Set Target Object Actions to Create and Update only (start with Delete disabled for safety):
| LangSmith App Attribute | Microsoft Entra ID Attribute | Matching Precedence |
|---|---|---|
displayName | displayName1 | 1 |
externalId | objectId | |
members | members |
- Groups must follow the naming convention described in the Group Naming Convention section.
If your company has a group naming policy, you should instead map from the
descriptionMicrosoft Entra ID Attribute and set the description based on the Group Naming Convention section.
Step 4: Assign Users and Groups
- Under
Applications > Applications, select your LangSmith Enterprise Application - Under the
Assignmentstab, clickAssignthen eitherAssign to PeopleorAssign to Groups - Make the desired selection(s), then
AssignandDone
Step 5: Enable Provisioning
- Set
Provisioning StatustoOnunderProvisioning - Monitor the initial sync to ensure users and groups are provisioned correctly
- Once verified, enable
Deleteactions for both User and Group mappings
Okta
You must use the Okta Lifecycle Management product. This product tier is required to use SCIM on Okta.
If you have already configured SSO login via SAML (cloud) or OAuth2.0 with OIDC (self-hosted), you may skip this step.
See SAML SSO setup for cloud or OAuth2.0 setup for self-hosted.
Step 2: Configure API Integration
- In the Provisioning tab, select Configure API integration.
- Select Enable API integration.
- For Base URL (if present):
- US:
https://api.smith.langchain.com/scim/v2 - EU:
https://eu.api.smith.langchain.com/scim/v2 - Self-hosted:
<langsmith_url>/scim/v2(note there is no/api/v1path prefix) or if subdomain is configured<langsmith_url>/subdomain/scim/v2
- For API Token, paste the SCIM token you generated above
- Keep
Import Groupschecked. - To verify the configuration, select Test API Credentials.
- Select Save.
- After saving the API integration details, new settings tabs appear on the left. Select
To App. - Select Edit.
- Select the Enable checkbox for Create Users, Update Users, and Deactivate Users.
- Select Save.
- Assign users and/or groups in the Assignments tab. Assigned users are created and managed in your LangSmith group.
Step 3: Configure User Provisioning Settings
- Configure provisioning: under
Provisioning > To App > Provisioning to App, clickEditthen checkCreate Users,Update User Attributes, andDeactivate Users - Under
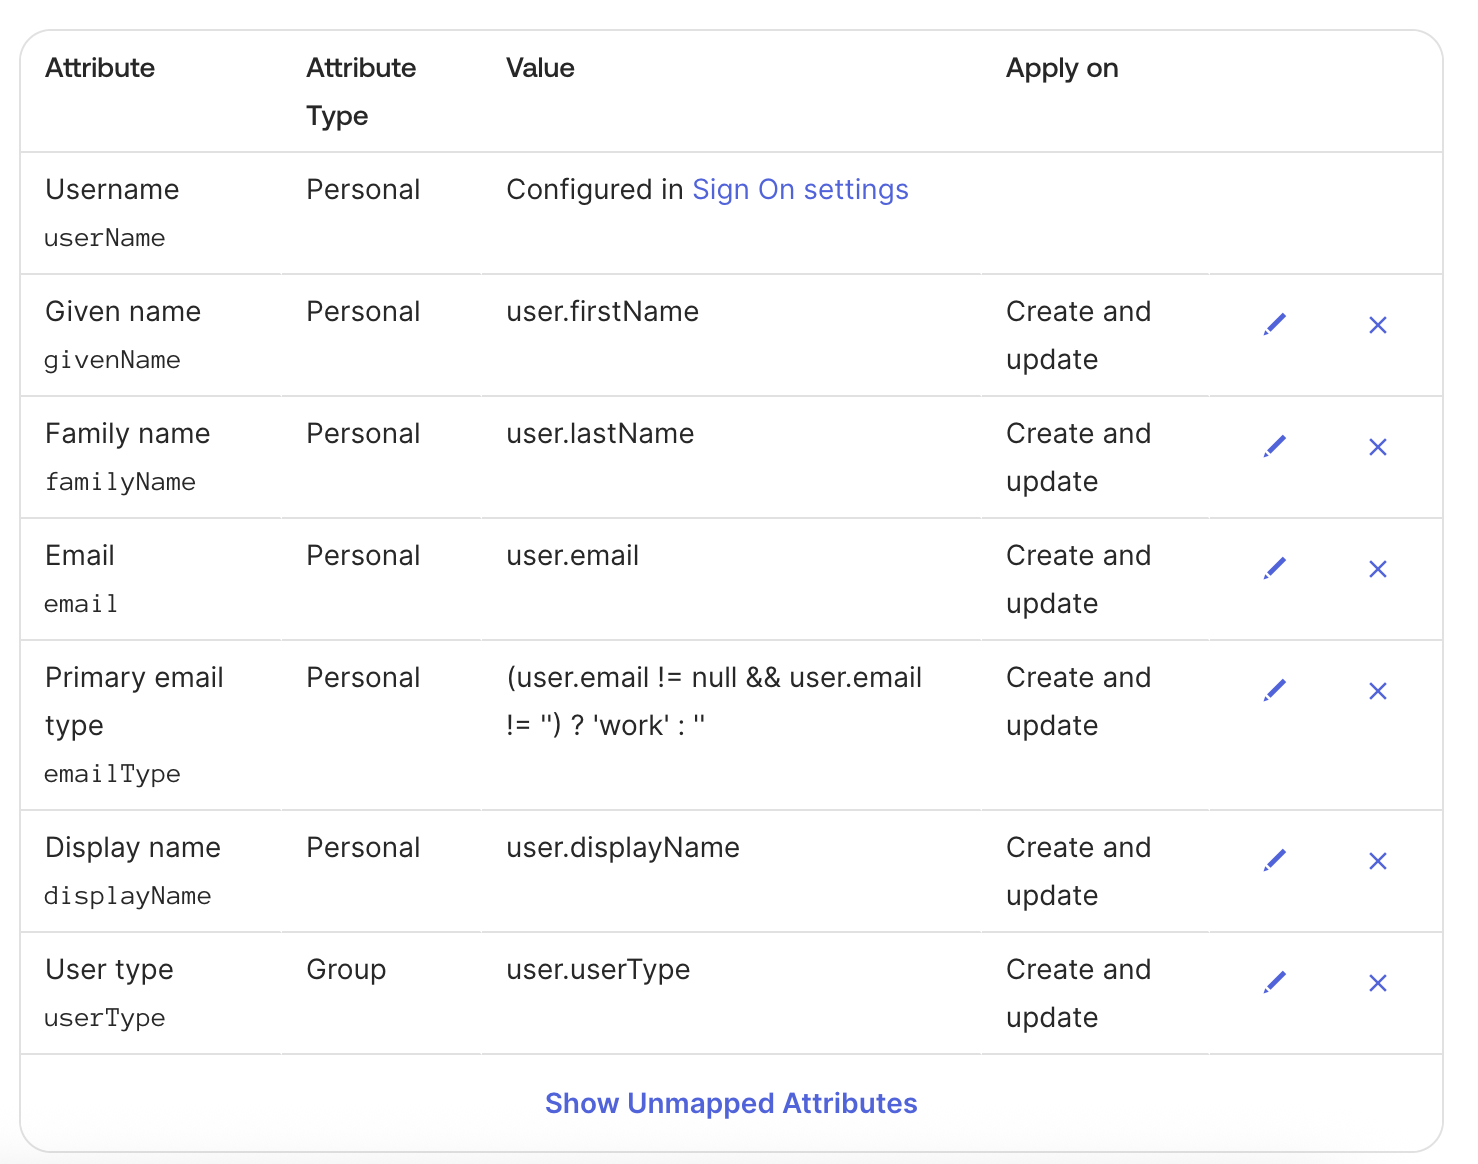
<application_name> Attribute Mappings, set the user attribute mappings as shown below, and delete the rest:
Step 4: Push Groups
Okta does not support group attributes besides the group name itself, so group name must follow the naming convention described in the Group Naming Convention section.
Follow Okta's instructions here to configure groups to push by name or by rule.
Other Identity Providers
Other identity providers have not been tested but may function depending on their SCIM implementation.
Troubleshooting and Tips
Support
If you have issues setting up SCIM, please reach out to support@langchain.dev.
FAQ
Can I use SCIM without SAML SSO?
- Cloud: No, SAML SSO is required for SCIM in cloud deployments
- Self-hosted: Yes, SCIM works with OAuth with Client Secret authentication mode
What happens if I have both JIT provisioning and SCIM enabled?
JIT provisioning and SCIM can conflict with each other. We recommend disabling JIT provisioning before enabling SCIM to ensure consistent user provisioning behavior.
How do I change a user's role or workspace access?
Update the user's group membership in your IdP. The changes will be synchronized to LangSmith according to the role precedence rules.
What happens when a user is removed from all groups?
The user will be deprovisioned from your LangSmith organization according to your IdP's deprovisioning settings.
Can I use custom group names?
Yes. If your identity provider supports syncing alternate fields to the displayName group attribute, you may use an alternate attribute (like description) as the displayName in LangSmith and retain full customizability of the identity provider group name. Otherwise, groups must follow the specific naming convention described in the Group Naming Convention section to properly map to LangSmith roles and workspaces.
Why is my Okta integration not working?
See Okta's troubleshooting guide here: https://help.okta.com/en-us/content/topics/users-groups-profiles/usgp-group-push-troubleshoot.htm.